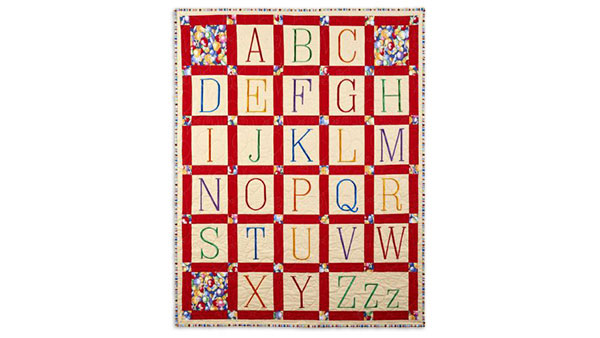
Snuggle under this quilt for an afternoon nap or hang it a child’s room. Each letter of the embroidered alphabet is stitched with a brightly colored thread while using a built-in font. Download printable instructions.
Materials:
- 1½ yards of 45” wide striped cotton fabric
- ½ yard of 45” wide balloon printed cotton fabric
- 1 yard of 45” wide red cotton fabric
- 1½ yards of backing cotton fabric
- Crib sized quilt batting
- Baby Lock Tear-Away stabilizer
- Water soluble marker
- Madeira sewing embroidery and quilting thread
- Basic sewing and quilting supplies
Tools:
- Baby Lock Unity Embroidery and Sewing Machine
- Crown Jewel III or Tiara III
- Pro-Stitcher Quilting Software System (Optional)
Steps:
-
Prepare the machine for embroidery first attaching the embroidery unit
-
Mark the striped fabric for the placement of each letter. Allowing an 8” x 8” square for each letter except the letter “Z”. Do not cut the fabric apart at this time.
-
Insert the striped fabric and stabilizer into the embroidery frame. Be careful to line up the stripes of the fabric carefully in the frame
-
Attach the hoop to the machine; select the first letter by using one of the larger built in fonts. Embroider the letter.
-
-
Remove the hoop from the machine and gently tear away the stabilizer.
-
Repeat the above process for the remaining letters except the letter “Z”.
-
Mark the placement for each of the three letters “Z”. Allow a space of 14” x 8”. Mark the center of this area at 7”; this will be the center of the medium sized “Z"
-
Mark the center of the large “Z” at 3¾” from the left of the 7” center. Mark the center of the small “Z” at 3½” to the right of the 7” center.
-
-
Embroider each of the “Z”s changing the size accordingly:
-
Large - 4.96” x 2.76"
-
Medium - 3.77” x 2.06”
-
Small - 2.83” x 1.84”
-
-
Cut each of the 25 letters into blocks that measure 6½” x 6”. Cut the “Z” block to measure 6½” x 13”.
-
Continue cutting as follows:
-
Red cotton: 35 strips - 6”x 2” 35 strips - 6½” x 2”
-
Balloon printed cotton: 3 square - 6½” x 6” 42 square - 2” x 2”
-
Striped cotton sashing: 2 sashing - 36½” x 1¼” 2 sashing - 46 ½” x 1¼”
-
-
Lay the blocks out into rows. The balloon blocks will be placed in the upper right and left corners. And in the lower left corner.
-
Sew the red strips (6½” x 2”) to the blocks. Press the seams towards the red strips.
-
Sew the sashing rows together using the 2” x 2” balloon squares and the 6” x 2” red strips.
-
Stitch the sashing rows and the alphabet rows together.
-
Stitch the top and bottom striped sashings to the quilt.
-
Stitch the two side striped sashings to the quilt
-
Set the Crown Jewel up for quilting. Wind several bobbins and thread the machine with the Madeira Quilting thread to match the quilt colors.
-
Using the Crown Jewel roll the batting onto the batting roller.
-
Pin and roll the backing fabric onto the backing roller. Pin and roll the top quilted section onto the top roller.
-
Position and pin all layers onto the top roller making a sandwich.
-
-
Quilt the layers together using either the free motion quilting technique or the Pro-Stitcher Quilting Software System.
-
Remove the quilt from the frame.
-
Square up the edges.
-
With the machine set up for sewing bind the quilt while using the following directions:
-
Cut several 2½” wide strips across the width of the fabric.
-
Sew the strips together to create one strip that will fit around the outer edge of the quilt.
-
With the wrong sides’ together fold and press the long edges together.
-
On one of the short ends fold under ½” and press.
-
Place the folded edge of the binding 8” down from one of the corners with the raw edges even with the quilts edge and pin in place.
-
Using a ¼” seam allowance sew the binding to the quilt by starting 4” down from the start of the binding and continuing down the side.
-
Stop ¼” from the first corner. Cut the thread.
-
Fold the un-stitched portion of the binding up and then down over the first corner so that the raw edges are even.
-
Tip: I like to press the corner at this time. This forms a 45˚ angle at the corner.
-
Starting at the corner continue to sew the binding to the quilt on the second side.
-
Repeat the prior directions for the remaining corners.
-
After turning the last corner trim away the end on the binding so that it fits comfortably inside the binding’s starting point. Continue to sew the binding in place.
-
Fold the binding to the back side of the quilt and hand-sew in place.
-


