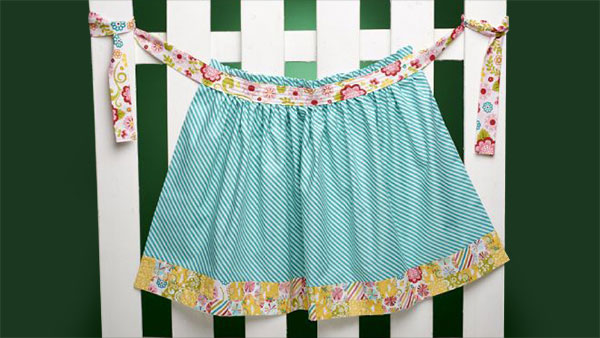
This apron is quick and easy to make especially when using the innovative features on the Baby Lock Destiny. It makes a great gift for friends and family who love being in the kitchen. It can be turned into a crafter’s apron too. Download printable instructions.
Materials:
- Several assorted print fabrics
- Coordinating striped cotton print for main section of apron
- White muslin for backing
- Madeira® cotton sewing thread
Tools:
- Baby Lock Destiny II
Steps:
-
Set the machine up for sewing.
-
With right sides together randomly piece two rows of 26 2” squares sections together using a ¼” seam allowance.
-
Press the seams in the same directions.
-
Piece the two rows together to form the bottom edge of the apron.
-
Press the seam downward.
-
Sew the quilted section to the bottom edge of the striped section. Trim edges to measure 39” wide.
-
Using a ½” seam allowance sew the apron front section to the white muslin section around the outer edge leaving a 4” opening on the top edge for turning.
-
Trim each of the corners and turn right side out. Whipstitch the opening closed. Press.
-
To gather the top edge on the apron machine baste 1½” from the top edge. Pull each end of the bobbin thread to gather to the desired width. Secure the threads.
-
To create the apron waistband and strings piece together the 4” x 40” strips to make one long 80” long section.
-
Fold the section lengthwise in half and sew along the long edge. Turn right side out.
-
Refold while centering the seam in the center back of the strip. Press. Fold in ½” on each of the ends and stitch ¼” of the edges.
-
-
Center and pin the waistband centered over the gathered line of stiches on the apron section.
-
Adjust the gathers evenly. The top edge of the apron will have the gathers peeking over the top edge of the waistband.
-
-
Sew four rows of stiches using the presser width as your guide along the waistband.
-
Attach the dual-feed foot to the machine and select the quilting category.
-
Select the Serpentine stitch.
-
Adjust the width to the maximum setting of 7mm.
-
Activate the Guide Beam.
-
Stitch four rows along the bottom pieced section of the apron using the needle guide beam to sew evenly spaced stitched lines.
-


