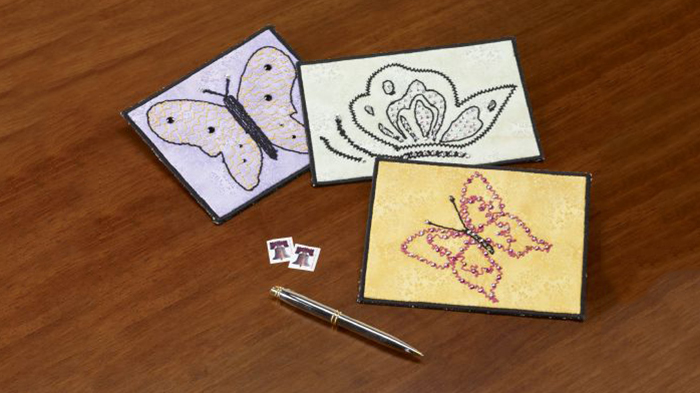
Looking for a great scrap buster project? Try these simple postcards! Use small sections of fabric that you can’t part with while using bobbin work and a bobbin case. Using heavy weight threads will add that special look while you can customize by printing out any clip art or design from your computer. Download printable instructions.
Materials:
- Any clip art or design printed from your computer
- Baby Lock Shape-Flex Interfacing cut to 4” x 6”
- Smaller size lightbox
- Cotton scraps in various colors
- Temporary spray adhesive
- Madeira threads (assorted colors)
- Monofilament clear thread
Tools:
- Baby Lock Sewing Machine
Steps:
-
In this project you can you can select any clip art image that you desire. Look for clip art that has outlines that are well-defined.
-
Using a lightbox trace your clip art design onto the Shape-Flex Interfacing.
-
Using temporary spray adhesive spray the opposite side of the interfacing without the traced design.
-
Select one scrap of fabric large enough to cover the interfacing and finger press smooth on the untraced side of the interfacing.
-
Tip: Create two sections of interfacing. One of the sections will be used for test sewing and the other will be the actual project.
-
-
With the machine on replace the bobbin case with the bobbin work bobbin case.
-
Hand-wind two bobbins with the silk thread and place one in the bobbin case. Do not slide the thread end through to the cutter.
-
Select a zig zag stitches in the machine and set the tension to .08. Adjust the width.
-
Thread the machine with clear Monofilament thread. You may also use polyester thread that matches the bobbin.
-
Note: These settings can be adjusted after you have test sewn on the extra interfacing. Look for even tension on both the top and the bottom of the test piece.
-
-
Place the interfacing section with the design facing upward and slowly follow the outline on the traced image.
-
Do not stop until you have completed the line.
-
Do not cut the thread using the auto trimmer on the machine. Pull the bobbin thread up and cut both the top and bobbin thread leaving a six-inch tail.
-
Tie a knot to keep the stitches intact. Repeat this step until all of the sections are stitched on the image.
-
-
Remove the section from the machine. Make any adjustments to the upper tension and the width of the stitch if necessary.
-
Cut another section from a solid fabric for the back side of the postcard. In the sample an ecru color was used for the backing.
-
Using the temporary spray adhesive lightly spray the backside of the interfacing section.
-
Place the solid fabric over the spread section and finger press smooth. Trim close to the outside edges to the desired size.
-
-
Remove the bobbin work bobbin case and replace with the original case.
-
Reset the tension on the machine.
-
To finish the edges of the postcard wind one bobbin with the same thread used on the top of the machine.
-
This thread can match or coordinate with the colors in the fabric. Thread the machine and select an appliqué satin stitch.
-
Set the width to 6.0mm and the length to .04mm. Satin stitch around the outer edge of the postcard.
-
-
To create a stamp cut out a small square from the fabric and attach to the backside of the card in the top right corner.


