
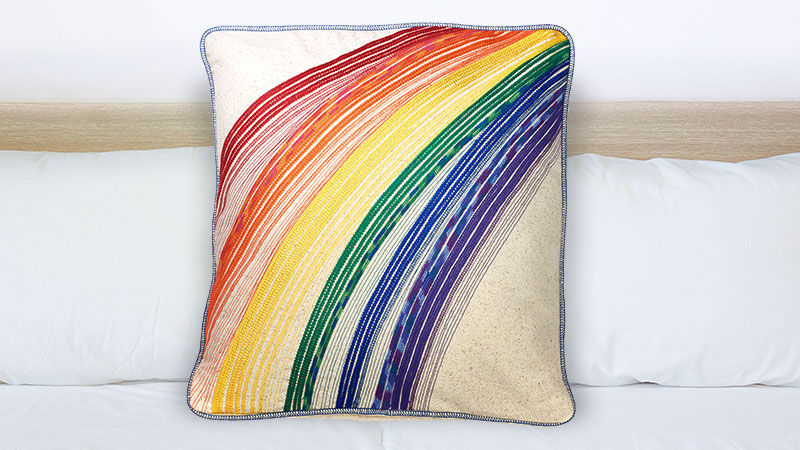
Get comfortable with threading and stitching on a Baby Lock serger with this fun pillow! Using a variety of colored and decorative threads will give this project a unique look that will pop! Download printable instructions.
Materials:
- Rainbow Colors of Madeira® Aerolock thread (2-3 of each color)
- Rainbow Colors of Madeira® Decora 6 or Cotona 4 Decorative Threads (1 of each)
- Purple Thick/Decorative Thread (like a jeans thread)
- Optional: Variegated Blended Color Decorative Threads (Madeira Decora 6 or Cotona 4)
- 1 Spool of Madeira® Aerofil Polyester Sewing Thread to Match Fabric
- 1.5 Yards of Home Décor Fabric (for pillow front and back and bias strips for cording)
- 19” Square Piece of Lightweight Fusible Interfacing
- 65” of 3mm-5mm Filler Cord (for cording)
- 16” Pillow Form
Tools:
- Baby Lock® 8-Thread Serger or Cover Stitch
- Serger Cording Foot 5mm (BLE8-CF)
- Baby Lock Sewing Machine
- Narrow Zipper Foot (ESG-ZF)
- Pearl and Piping Foot (ESG-PP)
Steps:
-
Numbered Cut your pillow front as a 19” square (I like to go larger because the cover stitch with decorative threads tends to warp your fabric until we square it off).
-
Fuse interfacing to the backside of this 19” square. Cut two rectangles at 17” x 12”.
-
Cut 2” bias strips for your cording (I love this technique)!Sew bias strips together to create about 66” of continuous bias.
-
-
Turn your front piece to the back side. Draw your arched curves on the interfacing with a light pencil or fabric marking pen.
-
You can be uniform with those curves or be more artistic.
-
I sketched my lines closer together in one corner and spread them as I drew them towards the opposite corner.
-
Draw as many lines as the amount of solid thread colors that you have.
-
I drew six lines to start with for red orange yellow green blue and purple and left room to fill in stitches.
-
-
Set your serger to a Narrow Cover Stitch with your regular serger thread in your right and left needle and your decorative thread in your Chain/Cover looper.
-
Need help setting your serger up for the Cover Stitch? Check out this tutorial!You will probably need to use a thread cradle to get that thick thread through the looper.
-
-
For Decora 6 and Cotona 4 threads use a practice fabric and start with a 3-4mm stitch length and find what looks best.
-
Don’t forget to take your first stitch into the fabric every time! Take note that you need to stitch on the backside of your project (where you drew your stitch lines).
-
You may also need to loosen your looper tension with these thick threads.
-
-
Start with red and work your way through each solid color to purple following the drawn lines on the back/interfaced side of the front piece. Take your time -- set you speed to slow.
-
If you have trouble getting your fabric out of your machine when you finish a stitch rotate the handwheel forward once and then backward until the needles are at the highest position.
-
This will unlock your stitch and release your fabric more easily. However make sure to pinch your thread ends so the stitch doesn’t pull out of the fabric.
-
Using the guides on the front of the foot space and stitch your lines as desired.
-
For the boldest lines I stitched two rows of cover stitching next to each other left a 1/8” gap and stitched another two rows next to each other for dimension and texture.
-
Press between stitching.
-
-
Once you’ve stitched all of your solid lines fill in stitches as desired. Try using complementary variegated threads in between your solid lines.
-
You can also change to regular serger thread in your cover/chain looper taking turns stitching on the back and front to give you more texture.
-
Fill your pillow with as much or as little color as you desire.
-
-
After you’ve completed your pillow front press and square up your pillow down to a 16.5” square. Taper the corners to eliminate dog-eared pillows!
-
On to the piping! Set your serger up for a Wide Cover Stitch with regular serger thread in the needles as well as the Chain/Cover looper.
-
Stitch a cover stitch along your bias strip about ¾” over from the edge again stitching on the wrong side so that the serger stitch side will be on top.
-
-
Next place your cording foot on your serger and set your serger up for a 4-Thread Overlock stitch.
-
As you fold your bias cording fabric over the filler cord make sure that the stitched decorative wide cover stitch wraps to one side (the front) of your cording.
-
-
Stitch your piping to your pillow with your sewing machine with the decorative cover stitch pinned facing down on your pillow.
-
I like to use the Narrow Zipper Foot but you can also use the Pearl and Piping Foot. You can still use the Overlap-and-Conceal method to join your piping ends!
-
-
For the back side of the pillow hem the width of one edge on each rectangle cut for the back using a sewn rolled hem.
-
For the sewn rolled hem press down a ½” roll it down another ½” to conceal raw edges and then stitch close to the folded hem edge (about a ½” down).
-
Overlap the two hems 3-4” and then baste the overlapped edges along the sides.
-
Place a basting stitch through the width where they are overlapped (this will hold them in place better when completing the next step).
-
-
Pin the front to the back evenly pretty sides together aligning the envelope opening horizontally to where you desire.
-
The envelope flap that is on top should be facing towards the bottom of the pillow. Cut down excess back fabric to match the size of your front.
-
Stitch around the entire perimeter right next to your piping. Stitch again if you need to get even closer to your piping.
-
-
Remove your basting stitches from the envelope opening turn right-side out and insert your pillow form! Enjoy!


