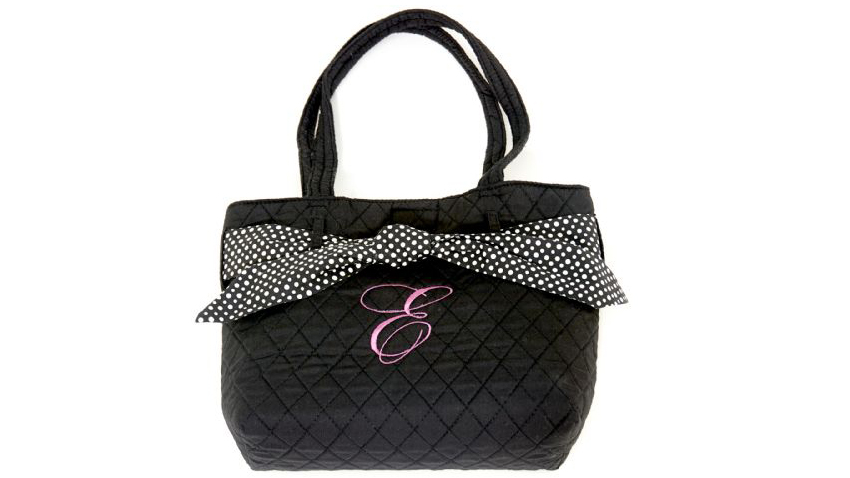
Jazz up any plain bag with a monogram! Use Designer's Gallery Monogram Works to create a personalized tote for yourself or a gift! We used the Christmas Scroll font collection but you can use any font that you love! With your multi-needle embroidery machine this project will come together in a snap! Download printable instructions.
Materials:
- Baby Lock Stick-Tear Tear-Away Stabilizer (BLT102)
- Baby Lock Positioning Stickers
- USB thumb drive
- Durkee™ EZ Frames Hooping System (3” x 4” frame)
- Madeira® Rayon embroidery thread
Tools:
- Baby Lock® Valiant embroidery machine
- Designer’s Gallery® Christmas Font Pack (EDGFP3) installed
- Designer’s Gallery® Everyday or Advanced Or Designer’s Gallery MonogramWorks
Steps:
-
Open EmbroideryWorks and click on the Create Letters icon on the top toolbar.
-
Type in the desired letter in the Set field.
-
Click on the down arrow and select the Christmas Scroll font.
-
Resize the design to 2 15/16” x 3 5/16”. The design needs to fit in the 3” x 4” Durkee frame.
-
With the design selected click on the Center Design in Hoop icon.
-
Save the design to a thumb drive by clicking on File Save As and save as pes. file format.
-
-
Set the machine up for embroidery:
-
Place a new bobbin in the bobbin case.
-
Thread the machine with the desired Madeira embroidery thread.
-
Attach the embroidery bracket for the Durkee EZ Fames to the bracket on the Valiant machine.
-
Attach the 3” x 4” Durkee frame to the Durkee bracket with no stabilizer applied.
-
Retrieve the letter design from the thumb drive.
-
Do a pattern test to be sure that the letter design fits inside the Durkee Frame. Move the design as needed.
-
Remove hoop from the machine.
-
Cut a piece of the Baby Lock Stick-Tear Tear-Away Stabilizer larger than the hoop.
-
Remove the covering from the sticky side of the stabilizer.
-
Place the sticky side up to the underside of the hoop. Fold the ends of the stabilizer up and over the front side of the hoop.
-
Finger press around the stabilizer to secure to the hoop.
-
-
Determine the placement of the design on the bag and place a positioning sticker.
-
Place the sticker-ed bag in the center of the stabilized hoop and finger press to secure to hold in place.
-
Place the hoop on the embroidery unit being careful that the bobbin case area on the machine fits inside the bag. Move the handles of the bag away from the needle.
-
Embroider the letter on the bag.
-
Remove the hoop from the embroidery unit and remove the stabilizer from the back of the bag.


