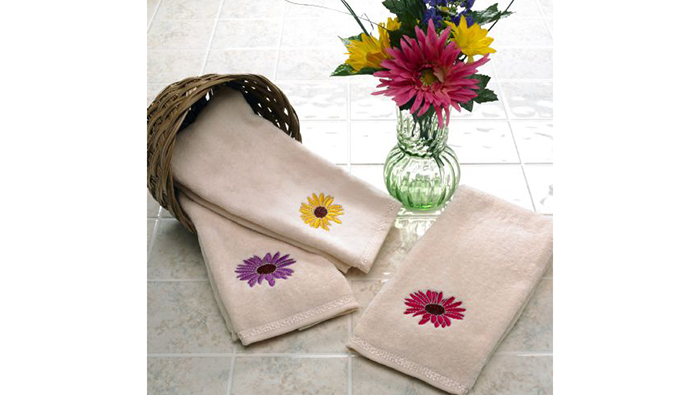
Give your bathroom a breath of fresh air with these flower embroidered hand towels. This project comes together quickly thanks to Designer's Gallery MasterWorks II Digitizing Software so you can make towels for yourself your friends your family teachers neighbors and just about anyone else! Download printable instructions.
Materials:
- 3 purchased cream colored hand towels
- Baby Lock® Tear-Away stabilizer
- Baby Lock® Hydro Melt Topping
- Temporary spray adhesive
- Sewing and embroidery thread
- General sewing and embroidery supplies
Tools:
- Baby Lock® Sewing and Embroidery Machine
- MasterWorks II from Designer’s Gallery®
Steps:
-
At the Computer:
-
In this project the recipe functionality will be utilized. Bring in an image then digitizing it using the Towel Recipe.
-
Attach the USB to an open slot. Open the program by clicking on the MasterWorks II icon on the desktop.
-
In this project the recipe functionality will be utilized. Bring in an image then digitizing it using the Towel Recipe.
-
Attach the USB to an open slot. Open the program by clicking on the MasterWorks II icon on the desktop.
-
-
Click on the New/Recipe icon on the top toolbar and follow the next set of steps:
-
Click on the down arrow next to Recipe and select the Towel Recipe.
-
If you have a different format other than .pes selected it at this time by click on the down arrow next to Machine Format.
-
Read the Recipe Description. This will give you important information about the fabric and which stabilizers will work for this project.
-
Click on OK. The default settings will have changed the pull compensation and the underlay.
-
Click on the down arrow next to Recipe and select the Towel Recipe.
-
If you have a different format other than .pes selected it at this time by clicking on the down arrow next to Machine Format.
-
Read the Recipe Description. This will give you important information about the fabric and which stabilizers will work for this project.
-
Click on OK. The default settings will have changed the pull compensation and the underlay.
-
-
Click on Backdrop tool on the left toolbar and select flower3color image from the installed location (C: Designer Gallery MasterWorks II Images clip art cd flowers color).
-
If you have not installed the images you can read and retrieve the image from the CD drive.
-
-
Follow the next set of instruction below to resize and to create the artwork areas:
-
Under the Properties field resize the image by changing the width to 65mm and click on Apply.
-
On the left toolbar click on the down arrow next to the drawing tools and select the Magic Wand tool
-
With this tool left click on the inside of each of the petals starting at the top of the flower and working to the right around the flower.
-
With each click in a petal the artwork for that area will be created and placed under Sequence View.
-
-
To edit the artwork areas follow the next set of steps:
-
Select the first area under Sequence View. On the top toolbar click on the down arrow next to the zoom tool and click on To Selection.
-
Click on the Reform tool on the left toolbar.
-
To edit the shape of the selected area left click on any of the Blue Boxes and move the point either in or out. If you need to further customize the area right click on the Blue Box.
-
From the list of commands you can edit the shape by using any of the commands. Edit all of the areas at this time.
-
-
To apply the stitches to the flower areas click on All Items under Sequence View and follow the next set of steps:
-
On the bottom toolbar click on Auto Column. In the Properties field change the Density to 0.6mm and click on Apply.
-
-
In this step the petal areas will be duplicated. They will be used for the outlines around the petals. Follow the next set of steps:
-
Click on All Items under Sequence View. Right click anywhere on the workspace and select Copy. Right click again and select Paste.
-
With the duplicated areas selected click on Run on the bottom toolbar. In Properties field set the Type to a Bean stitch and click Apply.
-
-
To create the center of the flower follow the next set of steps:
-
Click on the down arrow next to the Shapes tool and select the Circle tool. Click and drag an oval shape the size of the flower center.
-
If you need to adjust the shape you can pull the handles either inward or outward on any of the four sides.
-
To further customize the shape you can also use the Reform tool to move the blue points.
-
-
To fill the area with stitches follow the next set of steps:
-
Click on Color Blend Fill on the bottom toolbar. In the Properties field Change Color 1 to a dark color such as black.
-
Change Color 2 to a Chocolate Brown. Set the Gradient Density at 2.6.
-
Click on the down arrow next to Gradient Type 2 and select Linear increasing.
-
-
Click on File Save As and save as a Working File format (.blf). Then save as a .pes file to the media device that your embroidery machine will read.
-
Hoop the stabilizer in the hoop (200mm x 200mm) and spray with the temporary spray adhesive.
-
Place the Positioning Stitcker from the Ellisimo on the bottom center of the towel. Be sure that the larger of the two circles is placed towards the bottom of the towel.
-
Place the towel in the center of the hoop.
-
With the machine on and with the design merged onto the machine’s workspace select the Positioning Sticker icon on the embroider machine.
-
The machine will locate the sticker and reposition the design in the hoop. Remove the sticker.
-
-
Place a small piece of Hydro Melt Topping over the embroidery area and embroider the design using the thread colors of your choice.
-
Repeat “At the Embroidery Machine” Steps for the other two towels. Change the thread colors as desired.


