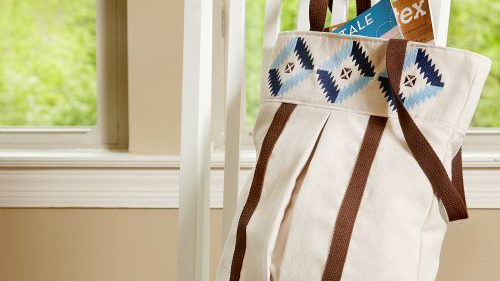
This tote is the ultimate shopping companion; this spacious carry-all will work for all your shopping needs. Make the bag using the Baby Lock Destiny II Sewing and Embroidery machine and add the design to the top band to create a one-of-a-kind look. Download printable instructions.
Materials:
- 1 ½ yards of solid colored home decorator fabric
- 3/4 Yard light weight print for lining
- 2 ½ yards of strapping for handles
- Baby Lock Tear-Away Stabilizer (BLT104) for embroidery
- Madeira® Sewing and embroidery thread
- Bobbin thread
- Frixion© pen
- Ruler and rotary cutter
- Temporary spray adhesive
Tools:
- Baby Lock® Destiny II Sewing and Embroidery Machine
Steps:
-
At the cutting table cut the following sections:
-
Cut two 20” x 15” sections from the decorator fabric for the outside body of the tote.
-
Cut two sections 20” x 6” from the decorator fabric for the top band on the front and back of the tote to embroider.
-
Cut two sections 20” x 15” from the lining fabric.
-
Cut two sections 18” x 5” from the lining fabric for the inside band.
-
Cut two pieces of tear-away stabilizer to fit the largest hoop.
-
Cut four sections from the straps that measure 15” long.
-
Cut two additional straps that measure 24” for the handles.
-
-
Turn on the machine. To retrieve the built-in design click on Exclusive Designs. Select “Around the World” category and select design 006 from the list.
-
Click on Set. To add additional designs to the embroidery field click on Add and select the same design. Select the duplicated design and move to the bottom of the workspace.
-
Repeat for the third design and move that design to the top of the workspace. Leave an even amount of space between each but be sure that the design is less than 300mm tall
-
-
Since there are three designs with duplicated colors on the workspace an easy way to speed up the embroidery process would be stitching all of the same colors at the same time.
-
To accomplish this click on Embroidery. Click on Edit then select Color Sort to group the same colors together. To view the change click on the Edit button.
-
-
Using the largest hoop for the Destiny II hoop the stabilizer.
-
Spray the stabilizer inside the hoop with the temporary spray adhesive. Determine the center on the decorator fabric top band sections and mark with a placement sticker.
-
Float the section over the hoop with the placement sticker centered in the hoop. Finger press to secure the fabric in the hoop.
-
Note: Some decorator fabrics will bruise if you hoop them so floating them over the hoop would be the way to go.
-
-
Set up the machine for embroidery:
-
Wind the bobbin with bobbin thread.
-
Place the bobbin in the bobbin case.
-
Thread the machine with the first color in the design. (Madeira embroidery thread was used in this project.)
-
Place the hoop on the embroidery unit.
-
Embroider the design.
-
Repeat for the other band section.
-
-
Trim the two band sections to 18” x 5” with the design centered.
-
On the two outside main sections of the bag determine the center line on each panel.
-
Measure 5” to the left and 5” to right of the center line and draw two lines from top to bottom on each of the sections using a Frixion pen. This line will be hidden by the straps.
-
-
Place the (4) 15” long sections of the strap centered over the each of the drawn lines from top to bottom.
-
Set up the machine for sewing
-
Sew along both edges of the straps to secure to the front and back sections.
-
To make the pleats on the front and back determine the center from left to right on each of the front and back sections.
-
Mark from top edge to the bottom edge drawing a straight line or use the markings on your cutting mat.
-
Measure 2” on each side of the center line and fold to the center line on the top and bottom edges. Pin in place. Repeat for the other section. Baste across the pleats.
-
-
With right side together on the main body front and back sections place a 6” bowl at the bottom two edges and cut to create a rounded edge.
-
With right sides together pin the two embroidered sections to the top of each of the tote front and back sections.
-
Using ½” seam allowance stitch the sections together. Press the seam allowance towards the embroidered band.
-
-
Place the tote front and back sections together with the raw edges even.
-
Using a ½” seam allowance stitch the sides and bottom edge of the bag together. Clip the curves and turn the bag right side out.
-
-
Using the two 20” x 15” lining sections pleat these sections the same way the outer sections were pleated in Step 12.
-
Round the corners as in Step 13.
-
Attach the lining bands to the top of the two lining sections.
-
Stitch the two lining sections together on the sides and bottom leaving a 6” opening on one of the side seams. Clip the corners. Leave the wrong side facing outward.
-
Place the handles even with the straps on the tote front and back sections. They should be 6” apart. Baste in place.
-
Place the tote section inside the lining section so that right sides are facing. Pin in place around the top edge. Using a ½” seam allowance sew around the top.
-
Turn the bag outward and push the lining inside the tote. Top-stitch ¼” from the top edge. Hand-sew the opening closed.


