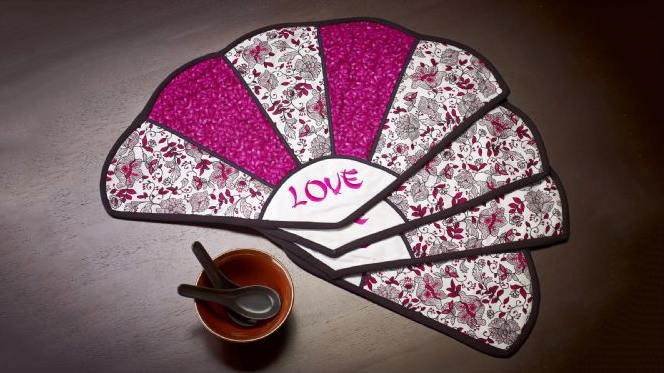
Use fun bright fabrics and this original placemat pattern to make your next dinner party a sure hit! To further personalize these trendy placemats use LetterWorks III™ from Designer’s Gallery®! Download printable instructions.
Materials:
- ½ Yard Asian print fabric for front and back
- ⅓ Yard Asian print fabric for front
- ½ Yard black cotton fabric for binding
- ⅓ Yard white cotton fabric for embroidered area
- Clover Quick Bias tape (black)
- Cotton batting
- 4.0 Twin needle
- Baby Lock Tear-Away stabilizer
- Temporary spray adhesive
- Sewing embroidery thread
- General sewing and embroidery supplies
Tools:
- Baby Lock sewing and embroidery machine
- LetterWorks III from Designer’s Gallery
Steps:
-
Open the program by clicking on the LetterWorks III icon on the desktop.
-
To place the hoop on the workspace click on menu View and click on Select Hoop. Select the 200mm x 200mm hoop. Click OK.
-
Click on the Grid icon to place the grid on the workspace.
-
To create the text click on the Text icon on the left toolbar. Left click anywhere on the workspace to open the Properties field.
Type in the word “LOVE” in the Text field in the Properties. From the drop down select the Pagoda font. Set the Height to 33.00mm and click on Apply.
-
Click on Print Preview and follow the prompts to print out a template of the design
-
Click on File Save As and save as a Working File format (.blf) and give the file the name Love. Then save to the media device that your embroidery machine will read.
-
If you wish to create other words for the other placemats repeat steps 1-6. Other words might include laugh sing or dance.
-
Using the template with the words “Cut One” on it cut one section from the white cotton fabric. This section will be used for embroidery.
-
Following the directions on the other template cut out the other front sections using the other two fabrics.
The backing and the batting sections will be cut later after the front has been pieced together.
-
Hoop the stabilizer and spray with the temporary spray adhesive.
-
Pin the printed design template onto the center of the white section. Place a positioning sticker over the center cross marks on the template.
-
With the design merged onto the embroidery machine’s workspace click on the Positioning icon.
The machine will locate and position the design based on the placement of the positioning sticker. Remove the template and embroider the design using the thread color of your choice.
-
Assembly: All seam allowances will be ¼″. Press all seams open
-
With right sides together sew the fan blades together alternating the section.
-
Sew the white embroidered section to the fan blades. Clip the curve so that the section fits.
-
Using the pieced section cut one batting section and one backing section from the first print fabric.
-
Sandwich the batting between the backing fabric and the top section.
-
Lightly spray with the temporary spray adhesive between the layers. This will hold the layers together during the quilting process.
-
Position and press the bias tape over the seam lines starting with the fan lines and ending with the curved section.
-
Using a 4.0 twin needle stitch the bias tape to the pieced top along the bias edges.
-
Cut several sections 2 ½” wide from the black fabric on the bias.
Piece together the bias strips to create one strip that is long enough to bind the placemat. Fold the bias strip in half lengthwise and iron. Starting 4″ from an end pin the bias strip with the raw edges even. Start to sew 4″ down from the end of the bias strip. Stop sewing ¼” from the corner. Fold the bias strip upward so that the edges are square with the quilt. Fold the bias strip down to create a 4 angle. Continue to stitch the binding to the placemat. Cut the end of the bias binding off and slip the end inside the binding at the starting point and sew in place.
-
Fold the binding to the backside of the placemat and hand-stitch to finish.


