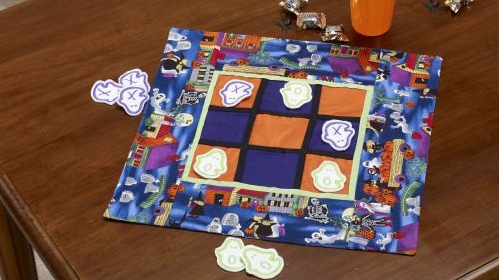
Scare up some spook-tacular fun this Halloween with a table top tic-tac-toe game. This fun game is a great way to combine serging embroidery and sewing into one and once it's complete will keep the kids entertained waiting to start trick-or-treating! Download printable instructions.
Materials:
- 4 Spools Maxi-Lock serger thread
- Fusible thread
- All-purpose thread to match fabrics
- Cut Away mesh stabilizer
- Five 4” x 4” squares of orange cotton fabric
- Five 4” x 4” squares of purple cotton fabric
- Two strips of 1 1/4” x 45” green cotton fabric - small border
- 1” Wide black cotton bias strip at least 55” long
- 7/8 Yard decorative Halloween print for borders and backing
- Iron and ironing board
- 5/8 Yard thin fleece or batting
- Rotary cutter mat and ruler
- 2 White felt squares for game pieces
- Fusible web
- Scissors
Tools:
- Baby Lock Evolution Serger
- Baby Lock Sewing and Embroidery Machine
- Designer’s Gallery LetterWorks III
- 3/4” Belt Loop Binder (BLE8-S12)
Steps:
-
Thread the serger and set it up for a four-thread stitch with the width set for ¼” stitch.
-
With right sides together and alternating the colors serge the 4” x 4” squares together in rows of 3. Press.
-
Once you have 3 rows of 3 squares serge the rows together. Press.
-
Set up the Evolution for a wide cover stitch with the fusible thread in the chain looper and attach the belt loop binder.
-
Insert black bias strip into the belt loop binder and serge the strip of bias. The edges are folded under and the fusible thread is visible on the underside of the strip.
-
Align and press the finished bias strips across the edges of the blocks so the bias covers the seam. Repeat for remaining seams.
-
Fold each of the green strips in half and press.
-
Reset the serger for the four-thread stitch. Stitch the raw edges of the green borders to the quilted square. Attach the top bottom and sides. Trim off any excess.
-
Cut two 4” wide x width of the fabric strips from the Halloween print.
-
Serge the border strips onto the center piece and press square off the side using the rotary cutter. Repeat to add the border to the bottom and sides. Press.
-
Trim edges so the project is square using the rotary cutting blade and mat.
-
Layer the batting then the backing fabric on your work area. Place the front onto the backing with right sides together. Cut the excess backing and batting to match the front piece.
-
Serge around all four sides leaving an opening in one side for turning.
-
Turn and press. Finish opening by pressing closed with a strip of fusible web.
-
For the game pieces open Letterworks III. Select the font “Bough Bough” and type “X" two spaces and "O” to create the Ghost letters.
-
Size the letters to approximately 2” in height. Save this design and transfer it to your embroidery machine using your preferred method.
-
Hoop one piece of white felt and stabilizer.
-
Embroider as many designs as you can fit into your machines hoop size. Leave even space between designs to trim them apart later. You will need 5 of each “X” and “O” piece.
-
Once the embroidery is complete remove the excess stabilizer from the entire felt piece. Fuse the remaining felt square to the wrong side of the embroidered felt square.
-
Trim around each piece close to the design.
Options: Use a glow-in-the-dark thread for the embroidery or top-stitching on the project to add additional Halloween fun!


