
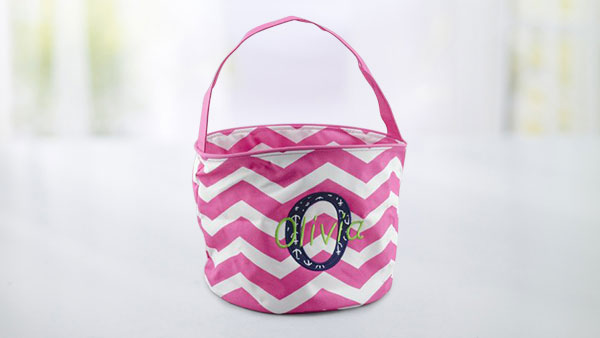
Items that once seemed challenging to embroider are now easy with the Baby Lock multi-needle machines. Jazz up a purchased blank bucket for all sorts of uses: for holiday gifts kid’s toys sewing knickknacks knitting supplies or anything else you might need to hold. Use the included 4” x 4” hoop or the optional circular hoops and you will see how easy it is to embroider hard objects with the free arm. Create a unique appliqué using built-in fonts and appliqué designs. Download printable instructions.
Materials:
- Fabric bucket blank**
- Fabric swatch for appliqué letters (approximately 5”x 5”)
- Decorative embroidery thread to coordinate
- Baby Lock Stabilizer Tear-Away Firm BLT103 or BLT104 (optional)
- Mettler® Web Bond spray or other adhesive spray
- Marking pen or Frixion Pen
- Appliqué Scissors
- Spray Starch or Best Press
Tools:
- Baby Lock Alliance Embriodery Machine
- 5” Circular Hoop and Frame holder “c” or the 4” x 4” hoop
Steps:
-
Hooping the Bucket:
-
Cut the stabilizer a little larger than the hoop of choice.
-
Lightly spray the stabilizer with the adhesive spray.
-
With marking pen measure and mark the center of the bucket front. A Frixion pen was used for this project.
The ink from this pen can be easily removed using an iron after you are completed with the project. You may want to test on your fabric for optimal finished results
-
Place the stabilizer inside the bucket and hoop the bucket using the 6” hoop. You may have to adjust the bucket a little to get it to lay flat and hooped.
-
Place the hooped bucket onto the Alliance frame holder “c”. With the freearm on the Alliance embroidering traditionally hard items is very easy.
Check to make sure any excess bucket fabric is clear of the hoop and needle area.
-
Thread the Alliance with the first thread color. You can also stage your additional thread colors on another spool for ease in transitioning colors during embroidery.
-
-
Creating the Embroidery:
-
Select the Settings page at the top of the machine page.
-
On page 1 select the Embroidery Frame Display to show the quadrant grid. This is helpful in laying out the design.
-
From the Home screen of the Alliance select the large font Icon.
-
Select the large block appliqué font or the Greek appliqué font. Depending on the name initial you are looking for you may still be able to use the Greek appliqué.
-
For this example in the Greek appliqué scroll to find the letter “O”. Touch Set.
-
On the Edit page select Size and resize the letter to its largest size.
-
Touch Add and select the built-in fonts.
-
Select font of choice.
-
Select the letter for the first name in the largest size and press Set.
-
Touch the Size Icon to adjust the size for a desired look. Touch Ok.
-
Position the name over the appliqué initial. Use the move keys or the stylus on the screen to fine-tune the design placement.
-
If desired select the Color Palette icon. Use the plus/minus keys to advance through and change the colors in thedesign. Touch OK when completed.
-
Touch Embroidery.
-
Use the Needle beam to ensure the design is aligned with the center mark on the bucket.
-
When ready to embroidery touch Lock and the Start/Stop button.
-
For the appliqué designs there are three parts to an appliqué:
Appliqué Position: The appliqué fabric is then placed over the positioning line. b. Appliqué Material: The fabric is then trimmed along the stitched line. Appliqué scissors make this easy to trim close to the stitch line. c. Satin Stitch: The satin stitch will encase the trimmed fabric giving the design a finished look.
-
For good results with an appliqué try starching your fabric before stitching down the fabric.
-
Cut the first color thread and tie-on the second color. Pull the threads through and re-thread the needle. Continue stitching out the design.
-
When embroidery is complete remove the frame from the machine and un-hoop the bucket. Remove the tear-away stabilizer from the back of the fabric bucket.
-
You may want to make more once you find how useful these are for holiday buckets kids toys sewing knickknacks knitting supplies or anything else you might need to hold.
-


