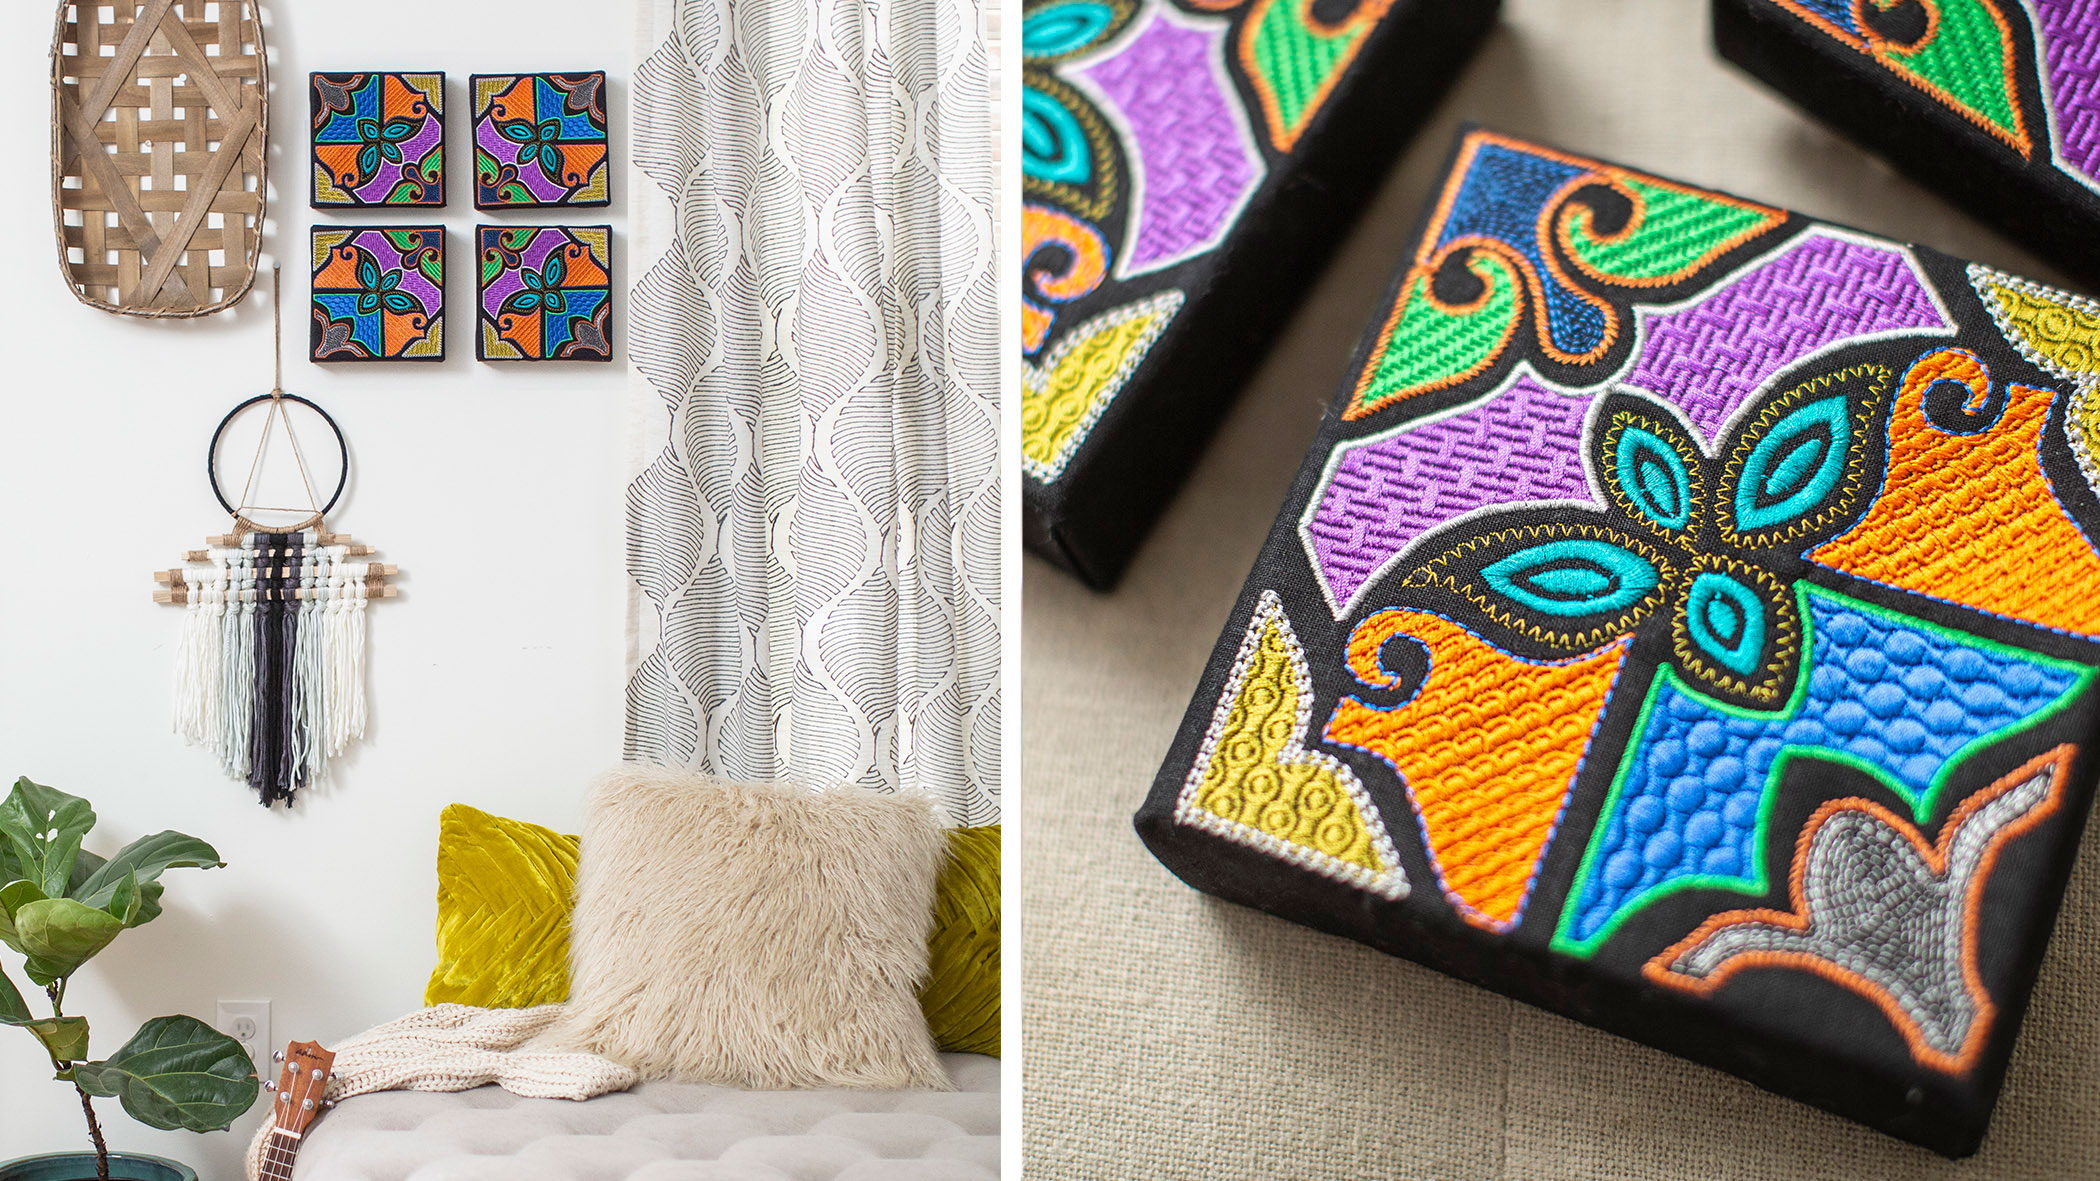
Looking for the perfect project to complete with your new Baby Lock Palette 11 Digitizing Software? Try these colorfully embroidered tiles! With decorative fills and unique designs you’ll proudly display this thread art in your home! Download printable instructions. Download embroidery files. Download file for digitizing the tile design.
Materials:
- Four pieces of Essex Linen each approximately 16'' x 16''
- Madeira embroidery threads—your choice of colors
- Bobbin thread
- Size 14 Embroidery needle
- Heavy weight cutaway embroidery stabilizer—enough to hoop 4 times
- Black fusible interfacing—4 pieces 10'' x 10''
- Four 6'' x 6'' x 1.5'' artist canvases
- Staple gun and ¼ '' staples
- Scissors Ruler Fabric marker
- Temporary adhesive spray
Tools:
- Baby Lock embroidery machine
- Palette 11 Digitizing Software
Steps:
-
Launch Palette 11. From Startup Wizard press the Hoop Size and Fabric button.
-
Select your machine type.
-
Select hoop size 200 mm x 300 mm and press OK.
-
In the fabric selector choose linen and press OK.
-
-
From the Image tab press OPEN.
-
Press From File.
-
Navigate to the .jpg file named Image for Digitizing Tile Design and OPEN.
-
NOTE: It is okay that the .jpg is wider than the hoop. We will rotate it 45 degrees later.
-
-
Refer as often as needed to the provided diagrams. Be sure to use your Zoom Tools.
-
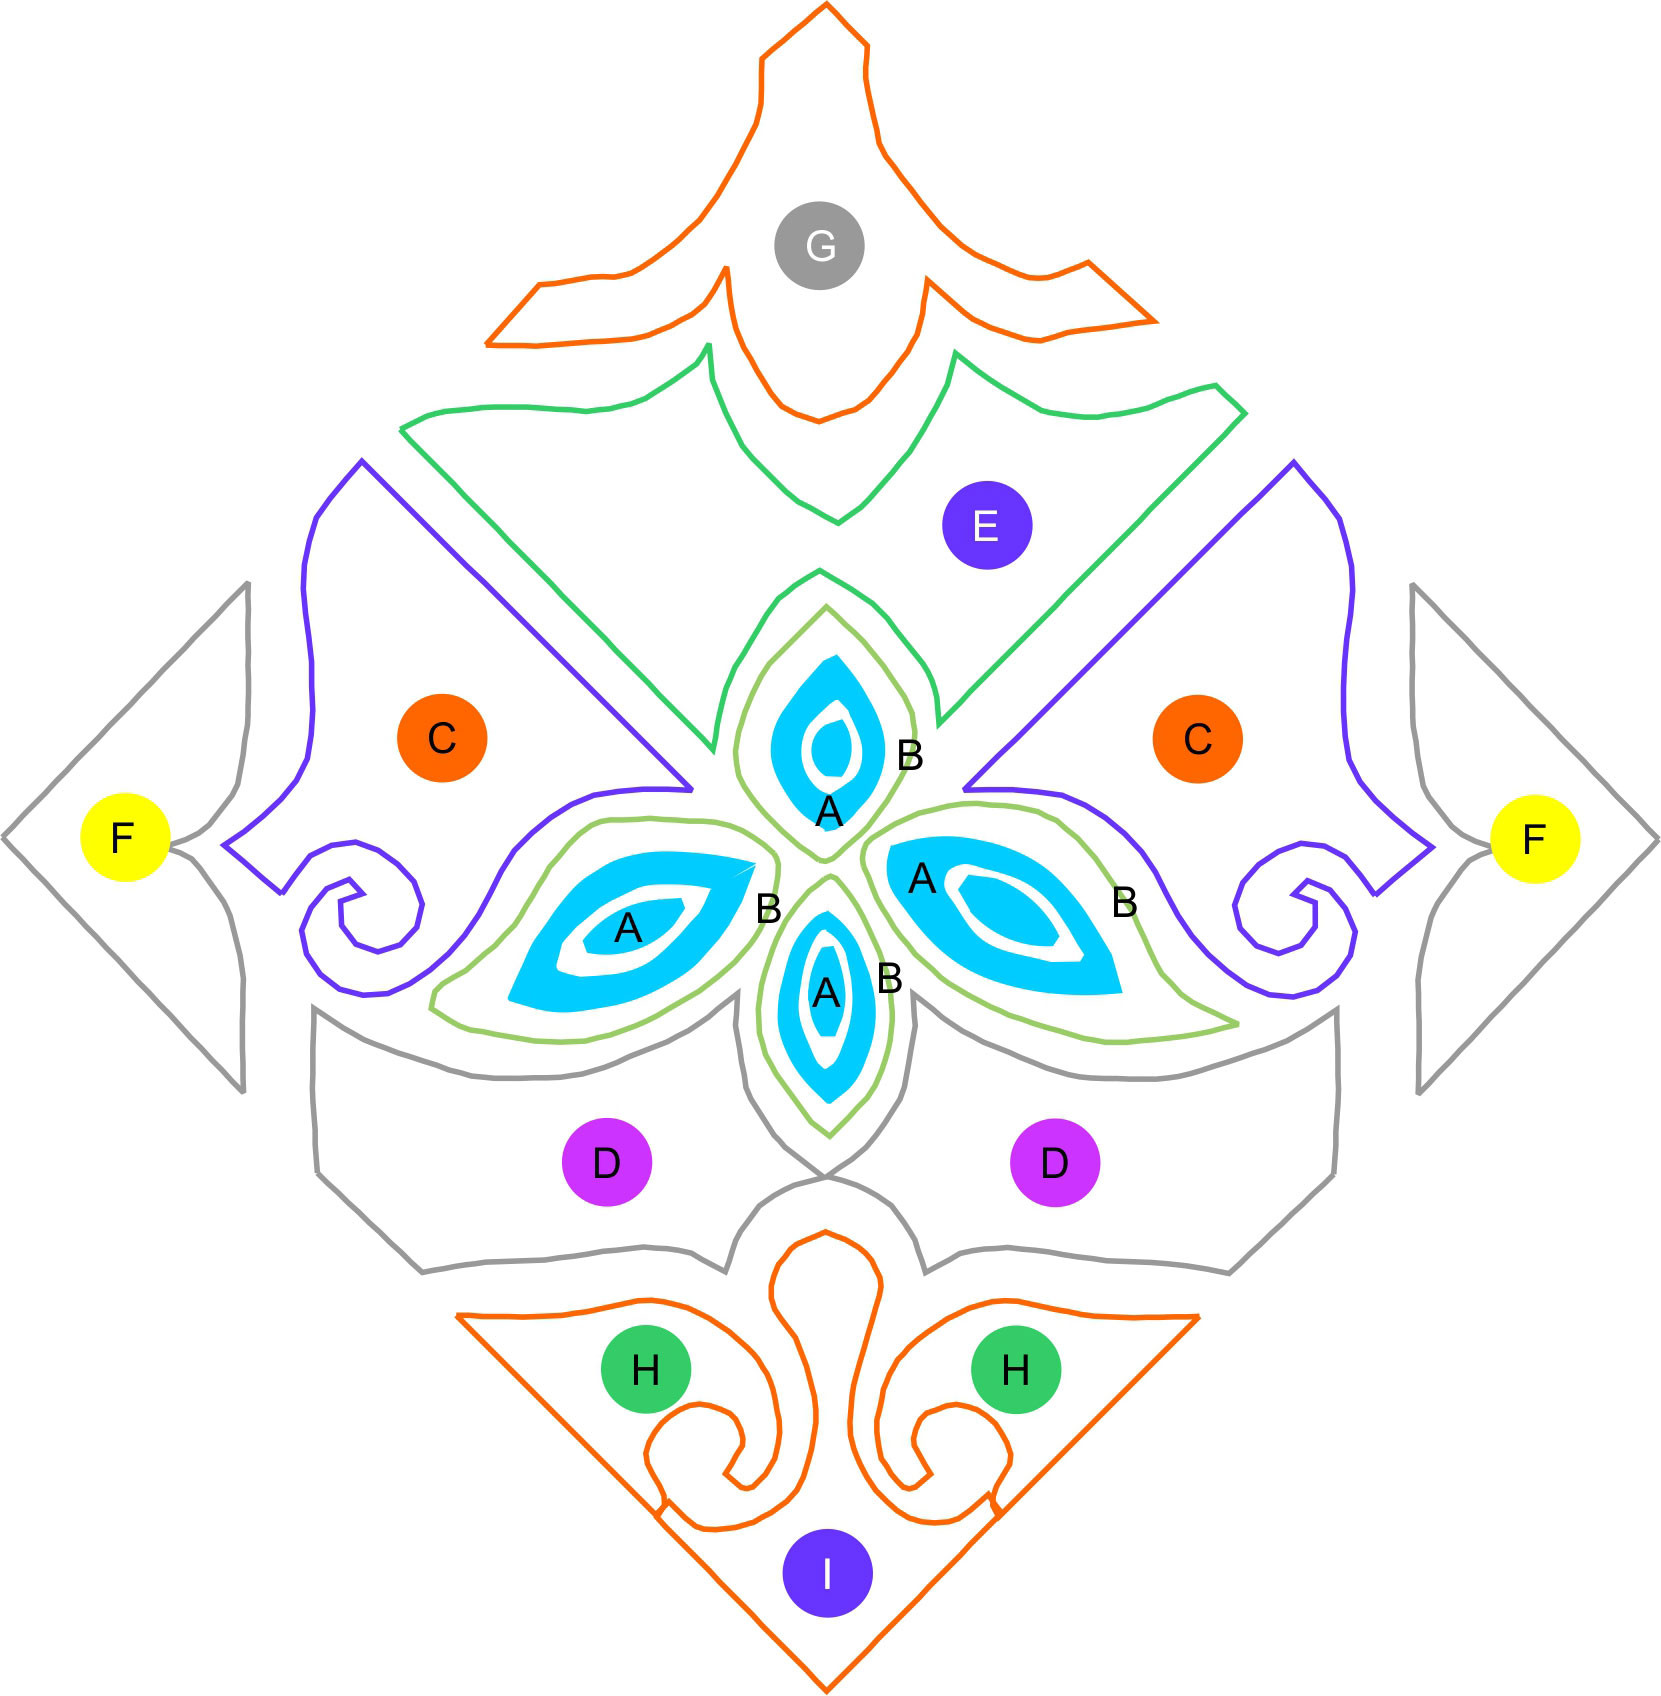
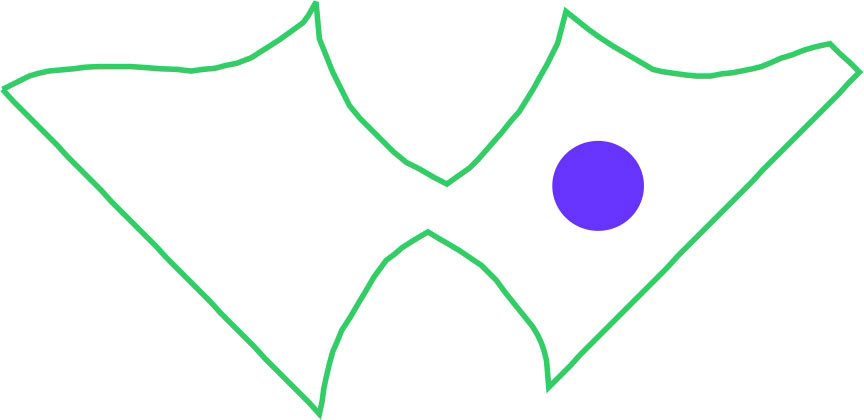
The individual components will be digitized but refer to the below diagram to see how all pieces will be laid out.
-
All ''A'' objects are digitized first.

-
Go to the Home tab then select shapes then manual punch then curved block.
-
Select a satin stitch. We selected color #1594.
-
Leave all sewing attributes as the default settings.
-
-
The ''B'' objects are next.

-
Click the Home tab then shapes then outline and closed curve
-
Your sew line type is the E/V Stitch and we used color # 1759.
-
In the sewing attributes choose the V stitch; set the interval to 3 mm; the stroke width to 2.5 mm; the run pitch to 1.5 mm. Leave the other attributes are the default setting.
-
-
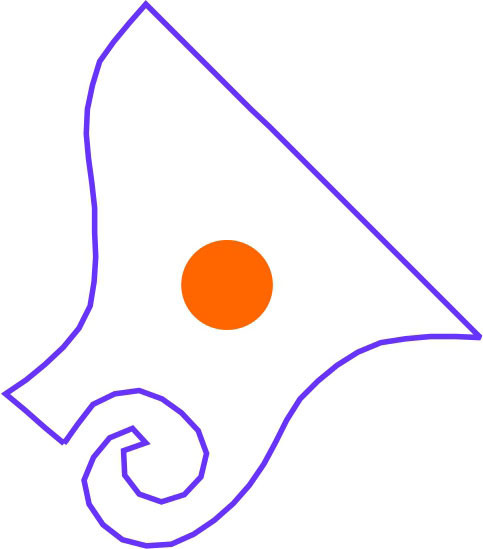
Now let’s digitize the ''C'' objects. The dot in the center is a reminder that the fill color is orange and the outline is blue.
-
Click Home tab > Shapes > Outline > Closed Straight Line.
-
After generating the stitches smooth some of the curved areas. Under select tools choose the select Points tool. Right click rough areas and choose To Curve in the small dialog box.
-
Select the triple stitch as your sew line type and set your run pitch to 3.3 and the color to #1829.
-
Under region sew select programmable fill and choose pat04
-
Select manual curve. Under select tools click the select points tool and when the object is selected you may edit the manual curve shape.
-
Set the color to #1755 and leave all other attributes as the default setting
-
With the object selected click arrange copy then vertical mirror copy.
-
When the copy appears on the work space move into position using the background image as a guide. Left click to set the mirrored object.
-
-
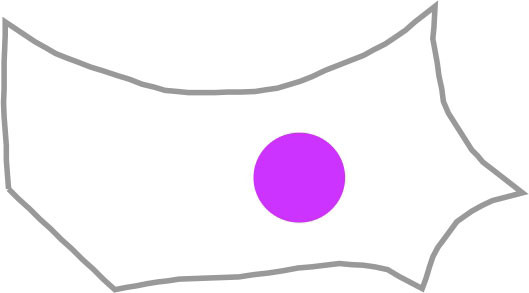
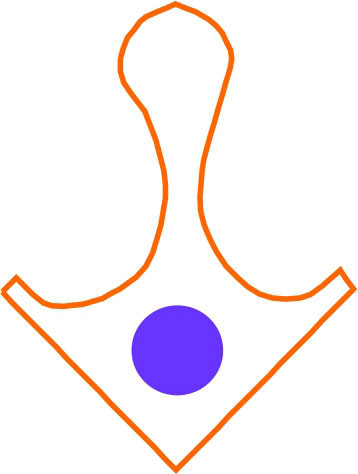
Now the ''D'' objects will be digitized. The dot in the center is a reminder that the fill color is purple and the outline is gray.
-
Click Home tab then Shapes then Outline then Closed Straight Line. After generating the stitches you will need to smooth some of the curved areas.
-
Under select tools get the select points tool. Right click on the point you want to change and choose To Curve in the small dialog box.
-
Set your sew line type to the zig zag stitch the color to #1810 and all other attributes remain the default setting.
-
Next click Region Sew > Programmable Fill > net3
-
Set the direction to manual straight line—198 degrees. Set for sharp corners (point). Set the color as #1831 and leave all other attributes as the default setting.
-
With the object selected go to Arrange Copy then Vertical Mirror Copy.
-
When the copy appears on the work space move into position using the background image as a guide. Left click to set the mirrored object.
-
-
Now we’ll digitize the ''E'' object. The dot in the center is a reminder that the fill color is blue and the outline is green.
-
Click Home tab > Shapes > Outline > Closed Straight Line. After generating the stitches you will need to smooth some of the curved areas
-
Under Select Tools get the Select Points tool. Right click on the point you want to change and choose To Curve in the small dialog box.
-
Set the sew line type to zig zag stitch the color to #1701 and leave the other attributes as the default.
-
Next select Region Sew > Programmable Fill > pat16
-
Set the direction to Manual Straight Line—180 degrees. Set for Sharp Corners (point) and the color as #1829. All other attributes are the default setting.
-
-
The ''F'' objects are next. The dot in the center is a reminder that the fill color is yellow and the outline is gray.
-
Choose Home tab > Shapes > Outline > Closed Straight Line. After generating the stitches you will need to smooth some of the curved areas.
-
Under Select Tools get the Select Points tool. Right click on the point you want to change and choose To Curve in the small dialog box.
-
Select the Sew Line Type as the Chain Stitch and the color # 1810.
-
In Sewing Attributes choose the diamond shape set the size as 4.0 Time—5 Arrange—stitch pointing right and Start/End Type--Feed
-
Region Sew > Programmable Fill > pat17
-
Direction is Manual Straight Line—270 degrees and color is # 1727. All other attributes are the default setting.
-
With the object selected go to Arrange Copy > Vertical Mirror Copy.
-
When the copy appears on the work space move into position using the background image as a guide. Left click to set the mirrored object.
-
-
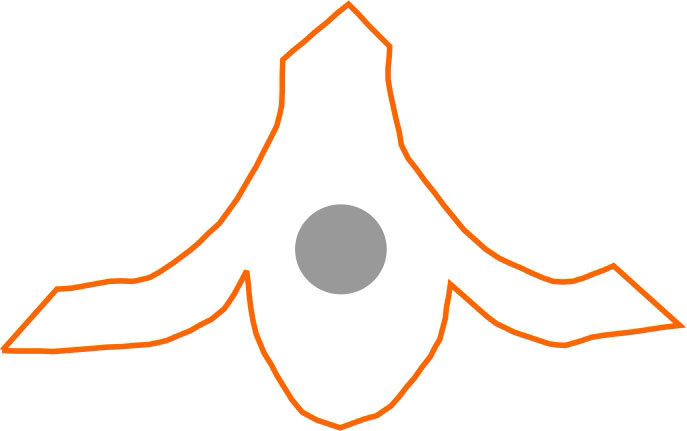
Now for the ''G'' object. The dot in the center is a reminder that the fill color is gray and the outline is orange.
-
Click Home tab > Shapes > Outline > Closed Curve. After generating the stitches you will need to straighten some of the curved areas.
-
Under Select Tools get the Select Points tool. Right click on the point you want to change and choose To Straight in the small dialog box.
-
Set the Sew Line Type as Stem Stitch color as #1755 and leave the attributes as the default.
-
Click Region Sew > Spiral Stitch > Color #1810. Set the density to 0.8 mm the run pitch to 3.0 mm and the Start Point—starts stitching on the outer edge of the shape
-
-
It's time for the ''H'' objects. The dot in the center is a reminder that the fill color is green and the outline is orange.

-
Click Home tab > Shapes > Outline > Closed Curve. After generating the stitches you will need to straighten some of the curved areas.
-
Under Select Tools get the Select Points tool. Right click on the point you want to change and choose To Straight in the small dialog box.
-
Set the Sew Line Type to Stem Stitch and choose color # 1755. Leave the Attributes on the default setting.
-
Under region sew choose programmable fill and wave1. Set the direction to manual straight line—194 degrees. All other attributes are the default setting. Choose Color # 1701.
-
With the object selected go to Arrange Copy > Vertical Mirror Copy.
-
When the copy appears on the work space move into position using the background image as a guide. Left click to set the mirrored object.
-
-
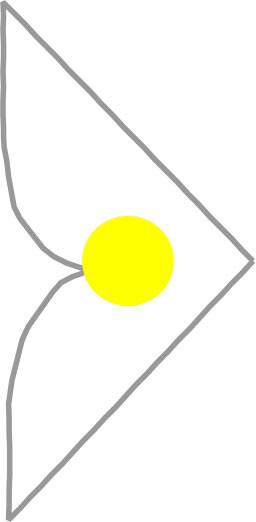
The last object is ''I''. The dot in the center is a reminder that the fill color is blue and the outline is orange.
-
Select Home tab then shapes outline and closed curve. After generating the stitches you will need to straighten some of the curved areas.
-
Under Select Tools get the Select Points tool. Right click on the point you want to change and choose To Straight in the small dialog box.
-
Click Sew Line Type is Stem Stitch and Color # 1755. The Attributes are the default setting.
-
Under Region Sew select spiral stitch and color #1829. Your density is 0.8 mm run pitch is 3.0 mm and start point—starts stitching on the outer edge of the shape.
-
-
Optimize the sewing order.
-
Select all objects group and rotate 45 degrees. Check the finished size.
-
Delete the background image (Image for Digitizing Tile Design)
-
Finally click File Save As and save your design. Send to machine.
-
At the machine:
-
Center and fuse a 10'' x10'' fusible interfacing piece to the wrong side of a 16'' x 16'' linen piece.
-
Hoop the stabilizer and the interfacing/linen unit.
-
Wind several bobbins with embroidery bobbin thread.
-
Choose your thread colors. Eight colors are used in this design.
-
Embroider four tile panels.
-
-
Trimming and mounting on a canvas frame:
-
Press each tile panel carefully and square and trim to 14'' x 14''.
-
Center the embroidery on the artist canvas using temporary adhesive spray to hold in place.
-
Wrap and staple the embroidered fabric to the artist frame carefully mitering the corners.
-
Select the perfect display area and show off your wonderful work!!
-


