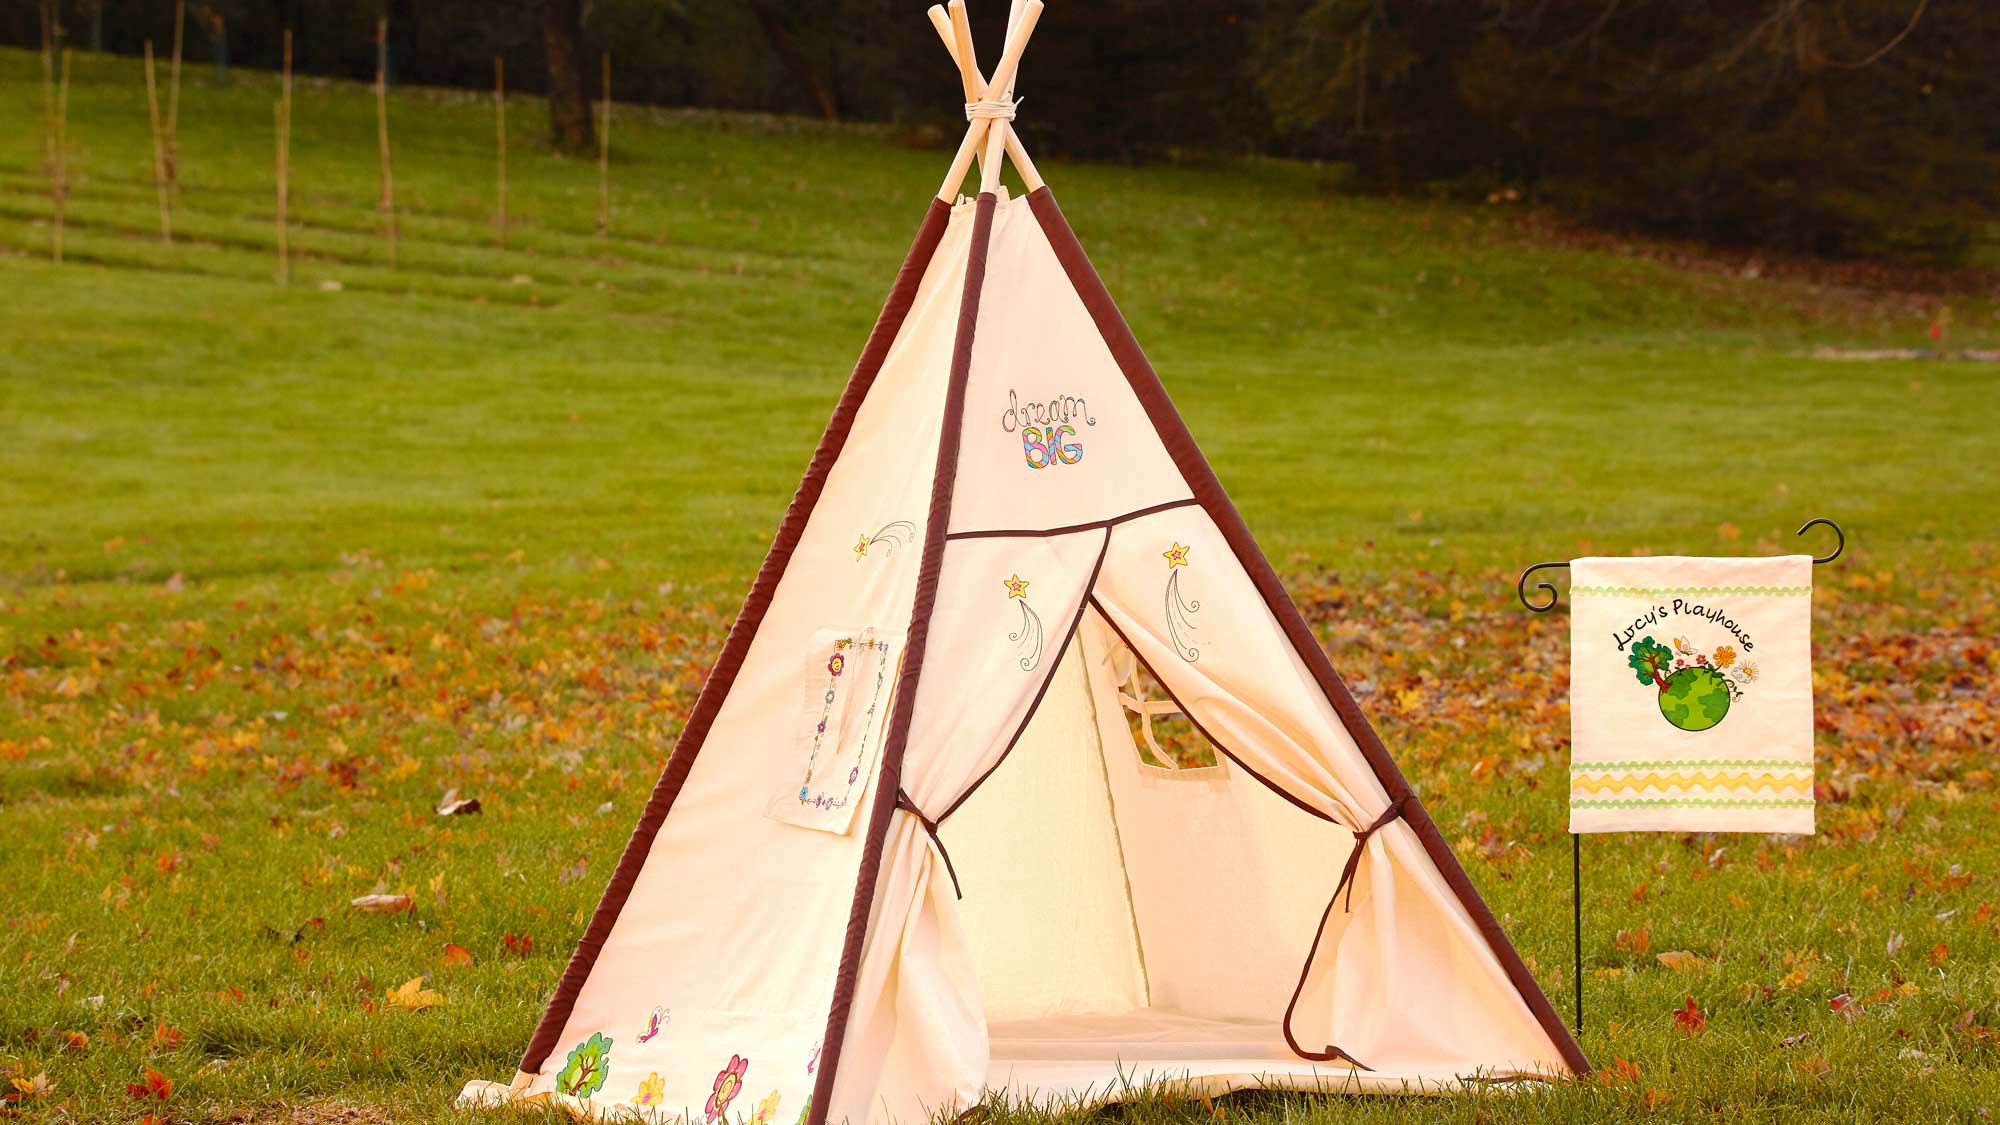
Give you children or grandchildren a special place of their own with this personalized tent! You can purchase one and embroider to customize or find a pattern and make your own. And don’t forget to create a flag to match so everyone will know who owns this special playhouse! Download printable instructions.
NOTE: There are several areas on the tent that will work well for placing an embroidery design such as over the flap along the bottom edges on the tent and around any window flaps. The choice is yours. In the sample several embroidery placement options will be discussed.
Materials:
- Purchased play tent
- Purchased blank garden flag
- Madeira® embroidery thread
- Baby Lock Tear-Away Soft (BLT104)
- Temporary Spray Adhesive
- Small yellow rick rack
- Large green rick rack
- Basic sewing supplies
Tools:
Steps:
-
Design above the front flap:
-
Set up the machine for embroidery.
-
Click on Embroidery and select Exclusives. Scroll over and select Sewlebrities and select design #017 Dream Big. Click on Set then Edit.
-
Click on Size. Select the second sizing option on the right. This sizing option will allow you to resize the design while maintaining the stitch density.
-
Select the icon with the four arrows pointing outward and resize the design so that it fits in the 9 ½” x 9 ½” hoop. In the sample the design was 7.47” x 9.37”.
-
Click Embroidery then Layout. Before we embroider place a basting stitch around the design. Select the Basting icon under Layout to automatically stitch around the design.
-
Using the Baby Lock Tear-Away stabilizer the 9 ½” x 9 ½” hoop and the area above the opening on the tent; if you can hoop the three items in the hoop.
-
If the hoop is too large you can float the tent over the hooped stabilize. Use the temporary spray adhesive to lightly spray inside the hoop onto the stabilizer.
-
Embroider the design onto the tent using the colors listed on the design. Remove the stabilizer from the backside of the tent. Press well.
-
-
Design on Front Flaps:
-
Click on Home Exclusives and select the Sewlebrities category. Select design #18 the shooting star and set.
-
Click on Edit then Size. Select the size button to maintain stitch density. Resize so it measures approximately 3.4” x 9.10 by using the icon with the four outward arrows.
-
Click on the rotate tool and rotate to the right 90˚. Click on Embroidery and hoop the tent area on the left front flap. Or float the tent over the stabilizer as needed.
-
Embroidery the design using the thread colors stated in the design. Click Return to get back to Edit. Click the Mirror icon to flip the design for the opposite flap.
-
Hoop the stabilizer and tent on the right side of the tent flap. Embroider using the same colors as the first shooting star design. Remove the stabilizer and press.
-
-
Designs on the Bottom Edge of the Tent and Window Flap:
-
Click Home. Place Sewlebrities designs #019 020 and 021 023 024 around the bottom edge. Place the designs 3-4" above the bottom edge. Use the camera for placement
-
Measure the window flap and jot down that measurement.
-
Retrieve design #16 from Exclusive Sewlebrities and set. Select Edit then rotate to 90˚ to the right. Click on Edit Size and the left side sizing option.
-
Resize the design to fit the window. The design should fit inside the window flap. You will need to adjust according to the size window that was measured earlier.
-
Hoop the stabilizer. Spray with the temporary spray adhesive. Place the window flap over the hoop and finger press. Click Embroidery to embroider the design. Remove stabilizer.
-
-
Garden Flag:
-
Retrieve design #022 and set. Resize the design as needed to fit on the purchased garden flag.
-
To personalize the flag click Add. Click on lettering #3. Select font #11. Using upper case lettering type in the first initial of your child's or grandchild's name.
-
Select the lower case font and type in the remaining letters of the name. Select the apostrophe from the punctuation icon. Then add the lowercase letter “s”
-
Click on the space to place a space between the two words. Go back to the upper case icon for the first letter in Playhouse. Use the lower case font for the rest.
-
Since we are using the large font you will get a message when entering the last letter that you will need to rotate the lettering. Let the machine rotate the lettering and set.
-
To edit the lettering click Edit. Resize the lettering so that it will fit above the world design as in the tent designs. Click and drag the lettering above the design
-
Under Edit click on the Font icon. Select Array. Select the arc icon
-
To adjust the arc of the lettering design click on the icon inside the green box until you have the right arc
-
Click on the Arrows on the bottom right side to adjust the placement of the lettering. You can also drag the font with your finger to adjust.
-
Click on OK when you are happy with the placement. Then click on Set. Click on Embroidery.
-
Hoop the stabilizer and flag in the hoop. Be sure that the flag is centered in the hoop. Embroider the design.
-
Finish by adding rick rack to top and bottom on the flag by attaching the “J” foot. Using coordinating thread straight stitch along the edges on the rick rack.
-


