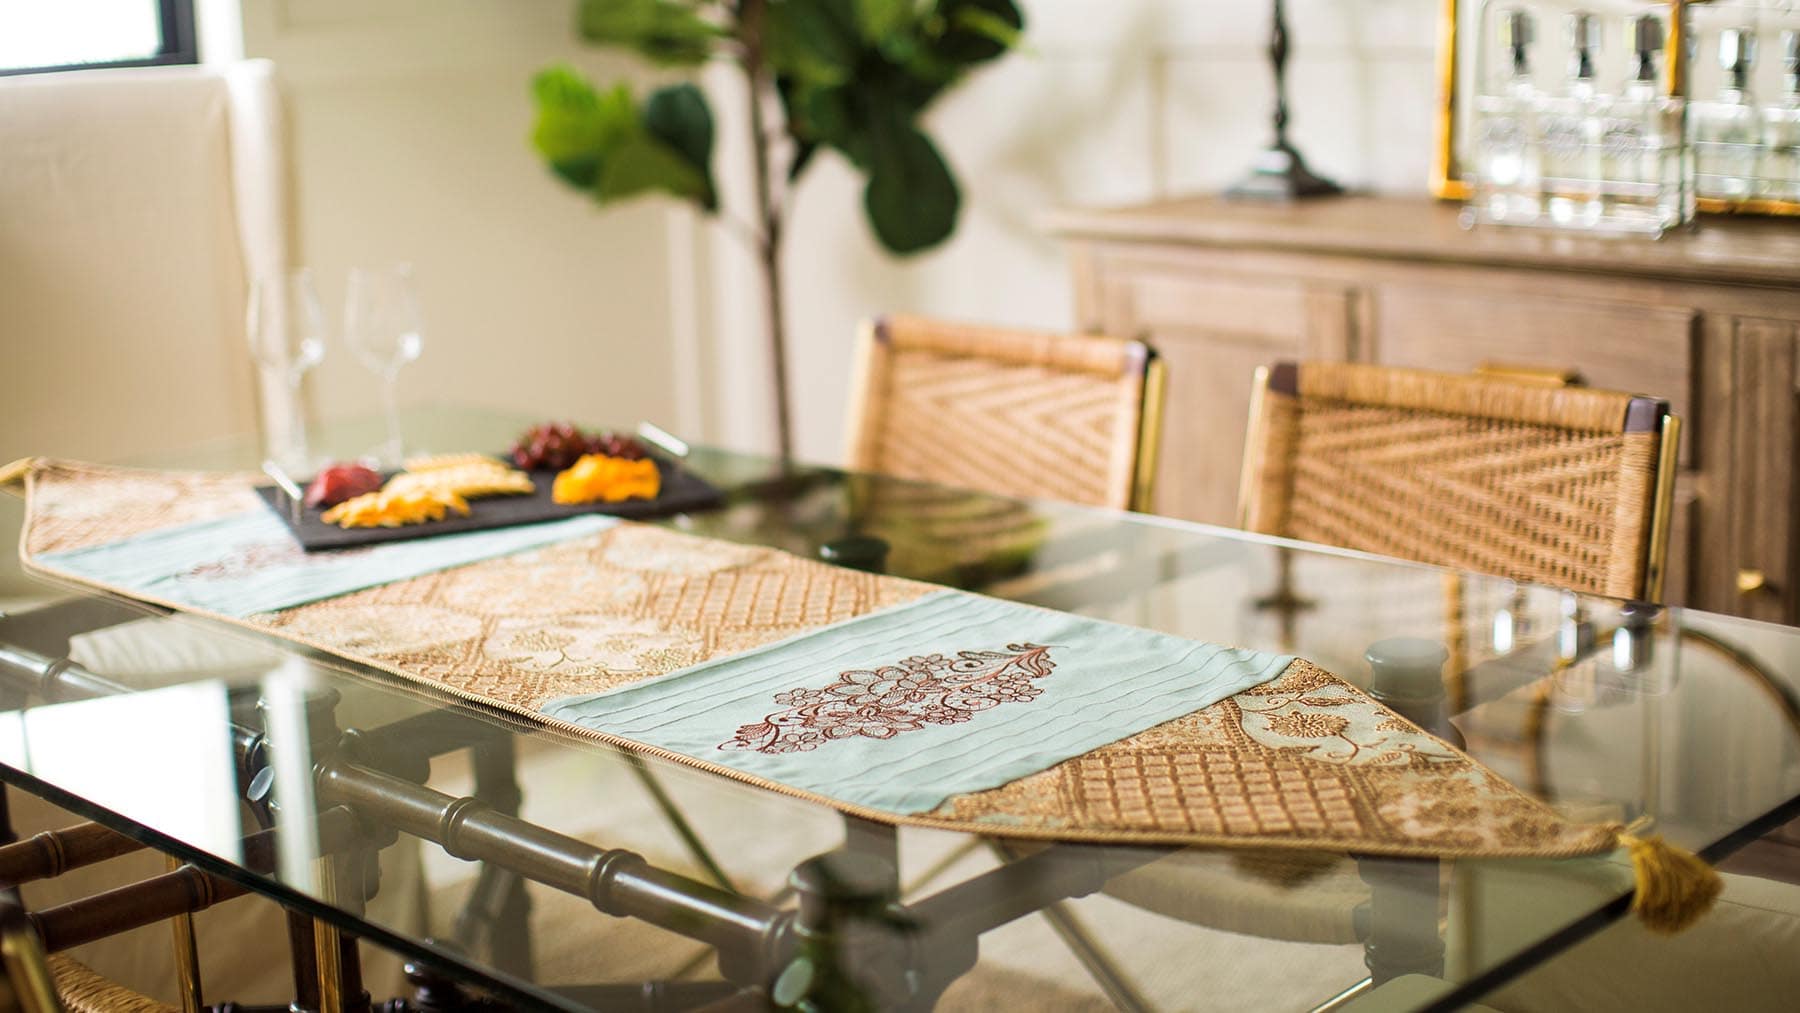
Add a touch of class and elegance to any dining room table with this embroidered table runner. The Solaris’ amazing sewing and embroidery features will make this runner easier than you can imagine and the Solaris-exclusive embroidery design will be the talk of every dinner party you host! Download printable instructions.
Materials:
- 10-5/8” x 16” hoop
- 1 Yard of printed decorator fabric
- 2 Yard of solid decorator fabric to coordinate with the print
- Madeira® embroidery thread to coordinate
- Madeira Cotona thread for sewing
- Baby Lock Tear-Away Firm Stabilizer
- Chalko pen
- Twin needles 2.0mm
- Basic sewing and embroidery supplies
Tools:
Steps:
-
Cut two sections from the solid decorator fabric that measures 20” square for embroidery. They will be cut down to size after the embroidery has been completed.
-
Cut two 20” x 20” pieces from the Baby Lock Tear-Away Firm Stabilizer.
-
Hoop the first decorator section along with one of the stabilizer sections in the largest hoop. Be sure to center the fabric in the hoop.
-
Gently pull outward on the canvas section around the sides to remove any wrinkles.
-
Tighten the screw.
-
Lock the hoop in place.
-
Attach the hoop to the embroidery arm.
-
-
Set up the machine for embroidery.
-
Thread the machine using the Madeira embroidery thread. Following the arrows on the machine while using the automatic needle threader to finish the job.
-
Wind a bobbin using the Finishing Touch Thread that comes packaged with the machine.
-
-
Place the hoop onto the embroidery unit.
-
To retrieve the design follow the next set of steps:
-
Click on the Embroider option on the opening screen.
-
Select Exclusives.
-
Select the Heirloom category.
-
Then select 001 design.
-
Click on Set to place the design on the workspace.
-
Under the Properties field on Page 8 click on the arrow on the right of the screen next to Frame Size and select the 9 ½” x 14” hoop size.
-
Click on OK to exit back to the workspace.
-
-
With this design use the Size Editing tool. Follow the next set of steps to resize the design larger:
-
Click on Edit.
-
Select Size from the Edit field.
-
In this field click on the second sizing option. This option will resize the design while maintaining stitch density.
-
When the following message appears on the screen click OK.
-
In the next field click on the arrows pointing outward to resize the design to its largest possible size (13.81” x 6.64”) that will fit inside the 9 ½” x 14” hoop.
-
Click on Ok.
-
Click on Embroidery.
-
-
The design is ready to for embroidery. Click on the Start button on the machine to embroider the design on the decorator fabric.
-
Repeat for the other solid decorator fabric section.
-
Cut the embroidered two sections so that they measure 16” x 13”.
-
Cut three 16” x 13” sections from the printed decorator fabric for the center and two for the two outer ends on the table runner.
-
Set up the machine for sewing.
-
Pin the embroidered sections to each side of the center section.
-
Using a ½” seam allowance and with right sides together sew the two seams together.
-
Piece the last two decorator print sections to the opposite ends on each of the embroidered sections. Sew these two seams together with right sides together and press open.
-
To create the pintucks on each side of the embroidered design follow the next set of directions:
-
Using a straight edge ruler and a Chalko pen four draw lines 1” apart from each other on each side of the two embroidered design sections.
-
Set up the machine for twin needle sewing.
-
Attach the twin needles to the needle bar.
-
Thread the machine with two of the same colored threads for each of the needles. Follow the same thread path for each of the needles.
-
To activate the Project Guideline Marker click on the tool .
-
Set the Guideline to On. You can also change the color of the guideline. Change the color of the marker to a brighter color than what you are stitching onto.
-
g) Place the table runner under the presser foot so that the Chalko line is centered under the needle while using the projected lines as a reference when guiding the runner.
-
Note: If your fabric is not very heavy you may need to stabilize the back of the runner where the stitches are to be placed to secure the stitches so that they do not pucker.
-
Repeat for the other drawn lines on both ends of the runner.
-
-
Lay the runner on a flat surface trim around the runner to even up the long edges. Trim off the ends at a 30˚ angle to create a point on each end. Repeat for the opposite end.
-
To create the backing for the runner cut one section from the printed decorator fabric the same size as the embroidered section of the table runner.
-
With right sides facing pin the two sections together.
-
Remove the twin needles from the machine and replace with a universal sewing needle (Size 80/12).
-
Select a left position straight stitch. Using a ½” seam allowance stitch around the outer edge of the runner leaving a 4” opening for turning.
-
Trim the corners and turn right side out. Push out the corners to attain a nice clean look.
-
Whip-stitch the opening closed.
-
To finish off the runner attach the Dual Feed Foot to the machine and stitch down each of the seam lines using a matching thread color (Stitch-in-the- Ditch).
-
Then top-stitch ¼” from the outer edge; around the entire outer edge.
-
-
Dress the table for your family and/or friends gathering.


