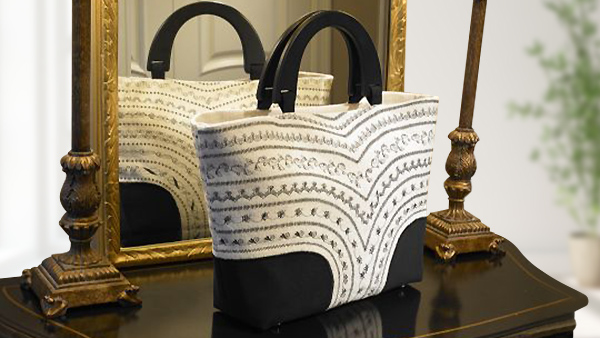
Have fun with decorative stitches when making this trendy bag. The Destiny has numerous stitches built right into the machine and you can use the on-screen editing tools to customize every stitch. You can even save your custom stitches for future projects. Download printable instructions.
Materials:
- Built-in decorative stitches
- McCall’s bag pattern M4400 or similar style
- Designer fabric and additional notions as listed on the pattern
- Madeira® sewing thread
- Baby Lock Cut-Away Fusible Stabilizer BLC204
- Temporary spray adhesive
- Air Erasable Marker
- Basic sewing supplies
Tools:
- Baby Lock® Destiny Sewing and Embroidery Machine
Steps:
-
Using the pattern guide sheet follow the directions for cutting out View E using the appropriate pattern pieces.
-
Fuse the Baby Lock Cut-Away Fusible Stabilizer to the wrong side on each of the front and back bag sections on section 20.
-
Stitch section 19 to both the front and back sections.
-
Using section 19 as your guide mark a line one inch away from the edge. This line will be curved.
-
To create rows of decorative stitches select the Character Decorative Stitch icon.
-
Select a stitch from either the 6th or 7th fields. Be sure to use the scroll down button to see all of the stitches. Try stitching on a piece of scrap fabric to get a feel for the stitches.
-
After you are happy with the look of the stitch go ahead and apply the stitches to the main section of the bag. Repeat for the back section of the bag.
-
-
Select a different decorative stitch and test sew on the piece of scrap fabric.
-
Place the edge of the presser foot along the outer edge of the first row of decorative stitches. Be sure that the presser foot stays vertical with the first row of stitches.
-
Once again when you are happy with the way it looks stitch the next row of stitches to the bag sections. Repeat for the entire front and back sections.
-
-
There are several editing functions that can add more personality to your bag. Edit with the tools on the right side of the screen.
-
You can size rotate and flip the decorative stitches and combine an assortment of different stitches to create a new look.
-
If you are not happy with any of the newly created stitch patterns you can delete one or all of the stitch patterns and start over with a new stitch pattern.
-
On the bottom of the screen you can change the size of the width and length while also adjusting the tension. You can also save the pattern to use at a later time.
-
-
Continue to follow the instructions from the pattern guide sheet in order to finish the bag.


