
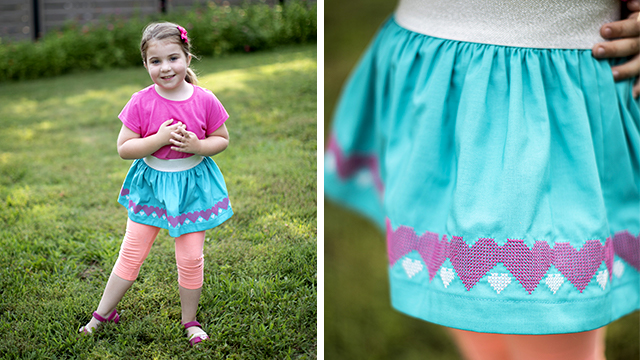
Looking to test your hand at continuous border embroidery? This is such a great project to practice it and it comes with a really sweet cross-stitched heart machine embroidery pattern (attached separately in the download file)! This tutorial is focused on creating the border embroidery technique but there are some sewing construction steps/tips included.
Click HERE to download printable instructions with additional photos. Click HERE to download the embroidery files.
Supplies:
Please also see all notes about supplies below the list!
- Baby Lock Sewing and Embroidery Machine
- Hoop Options:
- 6-1/4” x 10-1/4” or 5” x 7” Hoop
- 5” x 7” Magnetic Hoop or 4” x 7” Continuous Border Hoop Or if your machine has larger hoop capabilities you can certainly follow this tutorial with a larger hoop as well. Fill more of the hoop for less hoopings!
- Embroidery Foot or optional U+ Embroidery Foot (for applicable machines – the needle beam on this foot really helps with placement!)
- Basic Gathered Skirt Pattern or Tutorial (see below)
- Fabric amount based off of Skirt Tutorial plus extra
- Elastic (appropriate for exposed elastic waistband) based off of skirt tutorial linked below
- Embroidery Thread
- A roll of Baby Lock Rinse-Away Tear Away Embroidery Stabilizer
- Free PES Embroidery Design Files included with this tutorial (attached as separate files)**
- Fabric marking utensil that works for your fabric (i.e. Chaco Liner Frixion Disappearing Ink Pen or Air/Water Erasable). Make sure it is one you like and is easy to use because the lines we draw with it are important.
- Small 4-5” ruler (clear if possible)
- Rotary Cutter Mat and Ruler
Notes About Supplies The Baby Lock Machine: This tutorial was written using the Baby Lock Vesta machine and using the 4” x 7” Continuous Border Hoop or the 5” x 7” Magnetic Hoop. However you can use the standard hoop that came with your machine. The designs included with this tutorial can be applied to machines with only a 4” x 4” embroidery field or of course all the way up to machines that use a much larger hoop (including the Solaris Magnetic Hoop or the 4” x 12” Continuous Border Hoop if you’d like to take advantage of that hoop)! You will just need to adjust how you utilize this tutorial based upon the machine you have.
The Hoop: You can certainly use a basic hoop that came with your machine! However because we’ll stitch a portion of the border and then slide the fabric through to the next portion of the border the Continuous Border Hoop or the Magnetic Hoop will be your friend through this project making it really easy to slide the fabric through to the next portion!
The Skirt Pattern: I used this Baby Lock Skirt Tutorial (click or type in the link below). However for the hem instead of serging the lower edge with decorative thread I added 2.5” of fabric to the length to create a 1” rolled and topstitched hem. Whether you use that tutorial or purchase a pattern we’ll add extra length in the tutorial to come and then cut it down to size after embroidery! If you purchase a pattern you’ll want to use a pattern or tutorial that utilizes basic rectangles to create the skirt (this will make the skirt much simpler to follow the border edge for embroidery). A curved hem edge would be really tricky. https://babylock.com/learn-and-create/projects/simple-serged-and-sewn-skirt
The Fabric Amount: Get at least a half yard more of fabric than you need (based on the tutorial/pattern you use). We’ll need to cut the rectangles for the skirt length and width a bit larger to account for extra fabric needed for hooping. Then we’ll cut it down to size.
Thread Type and Machine Needle: You can use standard 40-weight Madeira Rayon or Polyester Embroidery Thread. If you want more of a matte finish consider a Madeira Polyester 40-weight Sewing or Frosted Matt Thread. Perhaps even consider Madeira Cotona 50-weight thread (this is what I actually used). With any of the above options use a Klassé 75/11 Embroidery or Universal Needle.
If you’d like the cross stitch to look a little more dense/filled in consider using a Sulky 30-weight thread (a bit heavier thread than the threads mentioned above) with a Klassé 90/14 Topstitching Needle. With a heavier thread and needle use a heavier stabilizer (like Baby Lock’s Tear-Away Firm stabilizer). Also with a heavier thread slow the machine embroidery speed down a bit in your machine’s setting menu.
Just keep in mind that you might get a little more lint with cotton threads (not a bad idea to brush out the built-up lint after stitching)!
Stabilizer: I highly recommend the Baby Lock Rinse-Away Tear Away Embroidery Stabilizer for this project. It gives great stability for the design gently tears away (or you can cut away most of it) and then gradually washes away in the washer.
The Free Embroidery Designs: These designs were created by Stephanie Struckmann in Baby Lock Palette Embroidery Software (using the Cross Stitch Wizard feature) and were only saved as .pes files to be used with Baby Lock machines. You may use them on whatever projects you like and sell the finished item(s). You may not sell the embroidery design files.
Instructions:
Please refer to the printable instructions for additional images that go along with some of the steps below.
- Once you have the measurements for the rectangle panels that you need to create the skirt (referencing the skirt tutorial I used) add 4” to the length of the skirt and at least 8” to the width of each panel. If you are using a pattern that uses rectangle panels make sure to do the same – add 4” to the length of the skirt and at least 8” to the width of the rectangle pattern. This step will allow you to accommodate for hooping the fabric. We will cut it down to size later. Cut out the panels with the extra length and width.
- Do not sew the side seams of the skirt yet we’re going to embroider first.
- You should have 2 or 4 panels to stitch out (or more if your pattern calls for it) depending on the amount of fabric you needed for the size you are making. Each panel will be stitched the same. If you are new to border embroidery you may want to stitch the first two designs out on some scrap fabric.
- Each skirt panel will follow these same steps. On the right side of the panel with your fabric marking utensil mark a line 4” in from the right edge. On the lower hem edge mark a line 3” up from the raw edge. The intersection will be used to line up the Left Corner of the first design.
- Measure and mark the width that you actually need (the original panel rectangle before you added the extra fabric based off of the measurement). This will help us know that we stitch out enough of the designs for what we need to complete a panel. You may actually need to pass up the short mark when embroidering but it gives us a visual of how long to keep embroidering. And it’s really ok to embroider past it because it all gets gathered up anyway.
- As you may know there are many hoop choices out there. If you choose any of the below here’s how you would hoop the skirt panel (with stabilizer layered underneath) in each hoop for this project. Make sure that the Hoop Arm/Connector is oriented at the top when placing the fabric in. If you are using the standard 6-1/4” x 10-1/4” or the 5” x 7” hoop that came with your machine hoop the fabric markings where the vertical line is lined up with the first raised notches (in from the right) on the inner frame. Make sure the horizontal line is lined up with the second notch up from the bottom. Hooping the horizontal line straight is the most important and the most important every single time you re-hoop. It will really help with alignment of the next design! The Continuous Border Hoop (an optional hoop) was really awesome for this project because there are lots of positioning notches on the top/inner frame and it was really easy to slide my fabric/stabilizer through to advance to the next portion of the border to be stitched. It was easier (and faster) to re-hoop the fabric to progress through the border. If you are using the Continuous Border Hoop secure your fabric with the vertical line even with the second notch in from the right. Line the horizontal line up with the fifth notch up from the bottom. Hooping the horizontal line straight is the most important and the most important every single time you re-hoop. It will really help with alignment of the next design! The new (optional) 5” x 7” Magnetic Frame though it doesn’t have as many markings on the frame was also really easy to use for a border and I LOVE how taught it held the fabric (because of how strong the magnets are). If it is compatible with your machine this frame is a great one to use as well for this project (but for lots of other projects too)! If you are using the Magnetic Frame it has minimal positioning markings on it. So I just lined up the raw hem edge with the hoop edge that is opposite of the Embroidery Hoop Connector because I knew they were both straight edges making sure that the lower marked intersection was within the embroider-able area of the frame with room for the entire design to stitch out. Then I placed two small pieces of painter tape where my line was straight horizontal line was to help with lining up the fabric for future hoopings. Make sure it is as straight as possible. Hooping the horizontal line straight is the most important and the most important every single time you re-hoop. It will really help with alignment of the next design!
- Pulling up the first design: If you are using a 5” x 7” hoop start with the StarterHeartsX3Repeat embroidery design file and Set it to your page. If you are using a 4” x 4” hoop start with the StarterHeartSingle embroidery design file. If you are using a hoop larger than a 5” x 7” hoop you will be able to start with the StarterHeartsX3Repeat and you might even be able to add a second set in (but use the HeartsX3Repeat or HeartsX2Repeat file for the second one if you’re able to add it (just line up the last larger heart and the first heart). You may notice there are extra files saved with single and double repeats that you may be able to utilize to maximize the full embroider-able area of your hoop. The “Starter” designs are only used on the very first stitchout for each panel (it has an extra heart to start the design out).
- Take it into Embroidery.
- To line up the design press the perimeter/outline key which will open a new menu showing 9 points of placement. You’ll notice the cross hair on your screen defaults to the center of the design. We want to find the lower right corner of the design but because of the rotated orientation we’ll technically need to select the upper right corner as shown below. When you select the upper right corner the needle will move to the upper right corner of the design.
- Click OK and use the arrow keys to position the needle right at the intersection of your drawn lines. If you’d like to check the perimeter of where the design will stitch out press this perimeter icon. The most important line to keep the lower edge of the hearts even with is that horizontal line that is parallel to the raw hem edge.
- Once it’s positioned squarely with the two lines stitch out the design. The goal is to get the 2 edges of the hearts to line up as best we can. One thing that’s nice is that the Cross Stitch pattern and the continual border lends itself well to small misalignments.
- After the design has stitched use a small ruler to draw a line along the edge of the last large heart down the middle of the small heart. If you have a clear ruler it helps to keep the line square with the horizontal line. Quite literally if you can get the line drawn on the outermost stitch points of the largest heart that’s optimal. The most important intersection to mark is at the very center bottom of the smaller heart (because that will help us line the next set of hearts up). Once you get the hang of it you might not even need to draw the vertical line. As long as you can hoop the fabric straight using the horizontal line and then line up that corner of the next design with the lowest center point of the last small heart you’re good to go! The vertical line is just a nice visual guide.
- Now it’s time to re-hoop your fabric. Take your time with each re-hooping! As best you can move the fabric through the hoop to the right lining up that horizontal line as straight as humanly possible with the same marks as we did before. Make sure that the vertical line is at or just to the left of the notch we lined it up with previously so that you know it’s within the embroider-able area. If at first you don’t succeed try and try again. If you’re using a Magnetic Hoop make sure to place the side magnets first to get that horizontal line lined up perfectly and then place the top and bottom magnets.
- Next clear the first design off the screen. We’re going to bring in a different design file in that does not have the top small heart (when oriented in the hoop) and this is the design we’ll use for the rest of the panel until the panel border is completely stitched. This second design looks very similar to the first but it’s very important that you select the correct design in order to make sure things line up properly! So check to ensure that your second design set matches the one shown below for the hoop you’re using (one small heart should be missing). If you are using a 5” x 7” hoop or larger hoop pull up the HeartsX3Repeat. If you’re using larger than a 5” x 7” you may be able to duplicate it or use other design files to maximize your embroider-able hoop area. If you are using a 4” x 4” hoop pull up the HeartSingle. Set the design to the page and take into Embroidery. Follow the same process. Select either the perimeter icon to get to the 9 points of placement and again select the upper right corner.
- Press OK and use the arrow keys to line up the needle with the intersection again. Once it’s lined up stitch away!
- When this one is done stitching continue the same process: draw your new vertical line re-hoop with special attention to the horizontal line and use the same design (that you just used). The design should still be on the screen. You may need to press the back button to return to the previous screen to access the move arrows (but the corner point of placement has likely stayed the same). Align the needle with the same corner as we’ve done twice already and stitch away. Continue all the way down until you get close to the mark you made for the actual panel width that you need.
- For the panel that I did I just needed one more repeat (one large heart and one small heart). So use whichever of the design files will work for your last section. Don’t use one of the “Starter” designs (as this will not allow you to line it up correctly). Also make sure to end on a small heart because we’re going to seam this skirt together down the center of the small heart matching up the larger hearts along the edge. It is way ok to be just shy of the mark (no more than 1”) and it is way ok to go past the notch (even up to 3” or 4”) as it will just all gather up into the waistband!
- Once the panel is complete follow the same process to complete any additional panels.
- Remove as much stabilizer as possible. If it is a wash-away stabilizer tear or trim it down as closely to the designs as possible. I opted to finish stitching the skirt and wash the stabilizer away later (so I didn’t have any raw edges to deal with fraying).
- Using the bottom of the hearts as a guide use a rotary cutter and long ruler to cut down and straighten up the raw hem edge. Cut the hem allowance down below the hearts to 2.5” (using the bottom of the hearts as your guide).
- Cut the side seams down. Use the larger heart edge as your guide and cut it down to a half inch away from the edge of the first and last stitched larger heart (even if you went past your width mark at the end). Finish the side seam raw edges (individually) with a serger a sewing machine overcasting stitch or pinking shears
- Follow the skirt tutorial to create the waistband.
- When stitching the side seams of the skirt (1/2” side seam allowances) make sure to line up the small hearts. I drew a line to help me ensure that my needle stitched right on that line!
The goal is to get them lined up as closely as possible so it looks continuous! - Press the seam open.
- For the hem I turned and pressed up a ½” and then a full 1”. Then I topstitched closely along the edge to create an approx. 1” hem.
- Follow the skirt tutorial to finish the waistband.
- NOTE: These artwork and designs were created by Tacony Corporation for use with the Learn and Create Projects www.babylock.com and were only saved as .pes files to be used with Baby Lock machines. You may use them on whatever projects you like and sell the finished item(s). You may not sell the embroidery design files.


