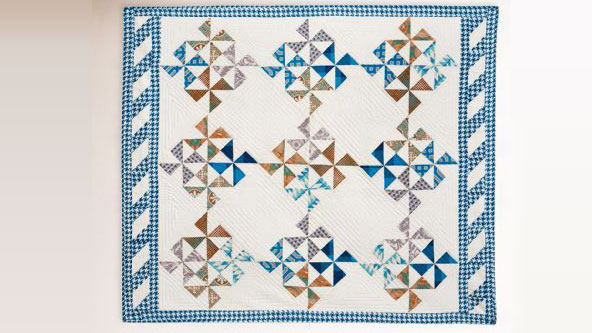
Pinwheel quilts are the perfect example of a quilt pattern inspired by a real object. Whimsical and decorative pinwheel quilts create gorgeous motifs that any quilter will love. Quilt Size: 52” x 60” Download printable instructions.
Materials:
- 1 Fat quarter bundle with assorted prints
- 3 Yards of white fabric for blocks and sashing
- 3 Yards of coordinating print fabric for sashing Backing fabric
- Madeira® Cotona thread for piecing
- Madeira Quilting Thread
- Batting
- Rotary cutter and mat
- 3” x 18” Straight edge ruler
- Basic sewing supplies
- Backing fabric
Tools:
- Baby Lock® Crescendo machine
Steps:
-
To create the pinwheel block cut the following sections:
-
From the assorted prints cut 36 3¾” squares
-
From the solid white fabrics cut 36 3¾” squares.
-
-
Using a pencil draw a diagonal line from corner to corner on each of the white 3 ¾” squares.
-
With right sides together place one of the print squares under the white square.
-
Thread the Baby Lock Crescendo machine and attach the ¼” foot.
-
Sew ¼” on each side of the drawn line.
-
Cut on the drawn line. You will now have two units.
-
Press each of the seams toward the darker print.
-
Sew the two units together to make one pin wheel unit.
-
-
Once you have the first four pin wheel units sewn together sew four pinwheel units together to make one 11 ½” square block.
-
Create nine pinwheel blocks total.
-
From the white fabric cut 2 17½” squares. Cut the squares diagonally twice to create 8 triangles.
-
Cut four 12” squares.
-
Cut two 9½” squares. Cut each in half diagonally to create 4 corner triangles.
-
-
Lay the 9 pin wheel blocks along with the white blocks on a flat surface to audition the lay out. Make placement adjustments at this time.
-
Sew the rows of blocks together.
-
Press the seams in the same direction.
-
Sew the rows together and press
-
To create the sashing on the top and bottom edge of the quilt cut several strips from the coordinating inside sashing fabric 2½” wide by the width of the fabric.
-
If the strip is too short piece the strips together.
-
-
Sew the sashing strip to the top and bottom edges.
-
From the coordinating fabrics cut 18 3¾” squares and 18 3¾” from the white fabric.
-
Follow steps 1-4 to sew the sections together.
-
Place sections on a flat surface. Sew 17 units together for the top and another 17 units for the bottom edge.
-
Sew the two units to the top and bottom edge of the inner sashing strip.
-
Cut several 2½” wide sashing strips from the coordinating fabric. Piece the strip together as needed to fit the length of the sides top and bottom edges on the quilt.
-
Layer the backing batting and the quilt top on a flat surface. Use adhesive spray to hold the layers together during quilting or pin the layers together.
-
Set the machine up with the Digital Dual Feed foot. Stitch-in-the-ditch along the diagonal seam lines.
-
Continue on with the quilting by allowing the edge of the Digital Dual Feed foot to rest along the already stitched diagonal lines to create channels on the quilt.
-
This will take some time so go slow and take breaks when needed.
-
-
Continue on with the quilting process until you have quilted the entire surface.
-
Trim the edges around the quilt so that the quilt is square.
-
Binding:
-
Cut several 2-1/2” strips across the width of the white fabric for the binding. Piece the sections together to form one long continuous strip.
-
Fold the wrong sides together along the long edge and press.
-
On one of the short ends fold in at a 45° angle and press.
-
Place the raw edge of the binding along the outer edge of the quilt starting 6” from the top corner and pin in place.
-
Using a 1/4” seam allowance start to sew 4” from the top edge of the binding and continue down the first side of the quilt.
-
Stop when you are ¼” from the corner and backstitch. Cut the thread.
-
Remove the quilt from the machine. Fold the binding up and then down over the second side of the quilt so that the raw edges are even to create a 45˚ corner.
-
Pin in place and sew the second side of the quilt. Stop 1/4” from the second corner; backstitch and cut the thread.
-
Follow the above Binding Steps to finish sewing the binding on the remaining sides of the quilt.
-
When you turn the last corner trim the end on the binding so that it overlaps past the starting point on the binding.
-
Tuck the binding inside the beginning point of the binding and sew in place.
-
Press the binding to the back of the quilt.
-
To finish your quilt hand-sew the binding to the backside of the quilt.
-


