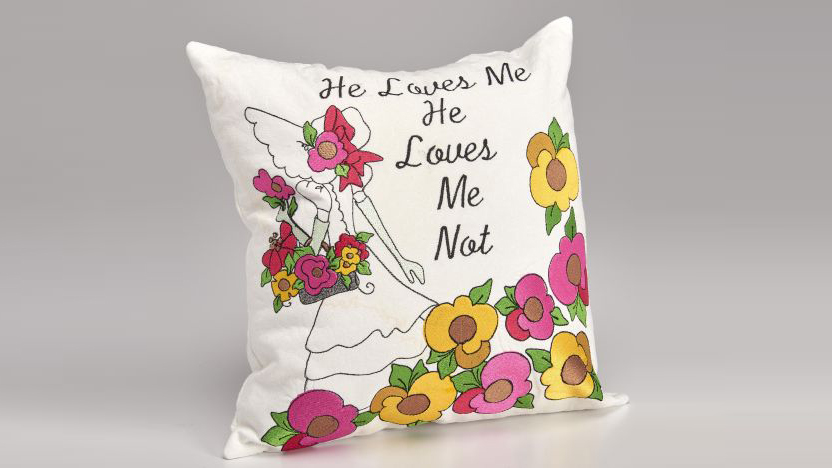
If you’re a fan of embroidery you’re sure to adore this lovely throw pillow. With this project I’ve created a coloring book style design that leaves the main image and text in a charming black-and-white which makes the flowers' bright hues pop! See how easy it is using the Baby Lock Destiny embroidery machine with the built-in IQ Designer. Click here to download instructions.
Materials:
- Blossom Designer Coloring Book by Lorlie™
- 1 yard cream fabric
- 18” Pillow form
- Baby Lock Ultra Soft Stabilizer
- Baby Lock Tear-Away Stabilizer medium weight
- Madeira® embroidery threads
Tools:
- Baby Lock® Destiny II
Steps:
-
Set up the machine for embroidery.
-
Carefully remove the Blossom design (page 1) from the book.
-
Place the Blossom page on the scan board and place the magnets at the top and bottom on the page (as shown in the illustration below).
-
Attach the board to the embroidery unit and follow the next set of steps:
-
Select the IQ Designer.
-
Select “Create Line Image”.
-
Select “Scan”.
-
After the scan is displayed on the screen drag the arrows inward to remove some of the art that will not be used. (For example hat poem three flowers). Do not remove the girl or the flowe
-
Click “OK” and then “Set”.
-
-
Fuse the ultra-soft stabilizer to the back side of a 22” square piece of the cream- colored fabric.
Hoop the tear-away stabilizer along with the fused fabric so that the design is placed on the left side of the fabric. Refer to the design placement on the pillow on the opening image.
-
Place the hoop on the machine; move the design as much to the left as possible and embroider.
-
For the remaining flower design follow steps 3 and 4 to create the flower on page 6 of the coloring book as shown in the illustration below.
-
Save the flower design in the memory of the machine.
-
Re hoop the embroidered design section so the flowers can be placed on the lower edge of the dress.
-
Using the camera feature scan the area inside the hoop.
-
Retrieve the flower design and place the design along the lower left bottom edge on the dress.
-
Add additional flowers as they fit in the hoop.
-
Re hoop as you go across the bottom edge of the dress and up the right side of the pillow as shown in the opening picture of the pillow. This may take several hoopings.
-
-
Re hoop for the lettering with the open area centered in the hoop and scan the area in the hoop.
-
Choose a built-in font and type the following words on separate lines “He Loves Me” (first line) “He” (second line) “Loves” (third Line) “Me” (fourth line) “Not” (fifth Line).
-
All of the lines should fit in the largest hoop.
-
-
Re-position the lettering as needed.
-
Embroider the lettering using black thread.
-
Remove the tear-away stabilizer from the back of the piece.
-
Press the section to remove wrinkles.
-
Trim the embroidered section 19” square. Be sure the embroidery is centered before you trim.
-
Cut another section from the cream fabric that measures 19” square for the pillow back.
-
With right sides together and using a 1/2” seam allowance sttich around the outer edge of the pillow leaving an 8” opening for inserting the pillow form. Insert the pillow form and hand stit


