Create this embroidered Christmas tray as a beautiful centerpiece for your coffee table or to give as a gift. The unique placement of this piece in a tray will be a show-stopper at any holiday gathering! Use Baby Lock Palette 9.0 or newer digitizing software to create these incredible embroidery designs. Download printable instructions.
Materials:
- Beige cotton fabric 24” x 24”
- Baby Lock Tear-Away stabilizer
- Madeira embroidery threads
- Purchased wood tray
Tools:
- Baby Lock® embroidery machine
- Winter Scapes from Amazing Designs (ADC-180)
- Baby Lock Palette 9.0 or newer
Steps:
-
Open the Palette 9.0 digitizing program by clicking on the icon on the desktop.
-
Click on Design Settings on the top toolbar and select the industrial machine icon. Under the Hoop Size select 360mm x 360mm and click OK.
-
Click on Import Designs from file. Locate the Winter Scapes from Amazing Designs (ADC-180).
-
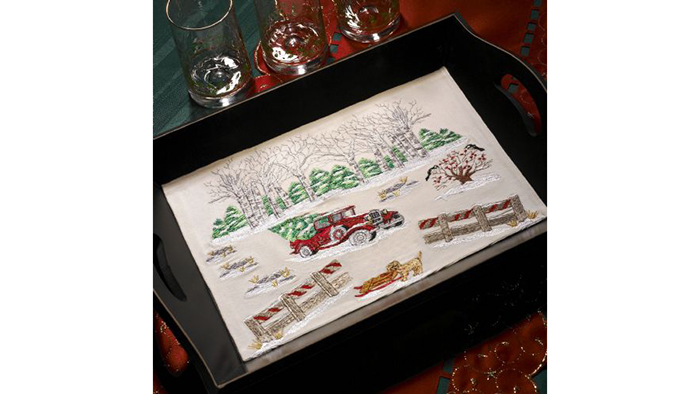
To begin with select the following six designs and place them on the workspace: CTR107. WTR108 WTR109 WTR110 WTR112 and WTR116. Move each away from the center.
-
-
To size and place the designs follow the next set of steps:
-
Select the multiple tree design. To resize the design hold down the CTRL key while dragging one of the selection handles to enlarge. Place this design at the top left.
-
Right click and from the list of commands click on Duplicate. Move the duplicated tree design to the top right
-
Select the rock design. Right click and select Duplicate from the list commands. Duplicate this same design so that you have a total of four designs.
-
Resize the first rock design smaller and place this design above the split line on the workspace. Resize the second rock design smaller and place below the first rock design at an angle.
-
Place the third rock design at an angle below the second design. Resize the fourth design slightly smaller and place to the right of center.
-
Select the design with the birds setting in the tree. Resize this design larger and place to the right of the fourth rock design but below the center line
-
Select the fence design. Resize the design larger and move into the bottom right corner. Slightly rotate the design to the right to angle the fence. Right click and select Duplicate.
-
Move the duplicated fence design to the bottom left corner. To flip the design click on the Arrange tab on the top toolbar and in the field select Flip Horizontally.
-
At this time you may choose to resize the fence designs. Again remember to hold down the CTRL key when resizing.
-
Select the dog and sled design and resize the design smaller. Place this design at the opening area between the two fences.
-
Select the truck design and resize larger. Click on the Arrange tab and click Flip Horizontal. Use the Rotate tool to rotate the truck slightly. Place the truck below the center line.
-
Make any additional adjustments to any of the design at this time (size or orientation).
-
Click on the File Save as and save your design to a folder that you created.
-
-
With the machine on and the communication cable attached to both the machine and the computer click on the Home tab in the Palette. Click on the Send icon and Send to the Machine.
-
Retrieve the design and place the first part of the design on the workspace.
-
Hoop the stabilizer and the fabric in the hoop.
-
Embroider the design using the thread colors of your choice. Madeira rayon thread was used in the sample.
-
When the first half of the design is finished follow the prompts on the machine to place the positioning stitcker. Select the second half of the design and embroider this design.
-
Measure the dimension of the inside of the tray. Add ½” to all sides and trim away the excess fabric. Fold under ½” on all sides and press. Top stitch close to the edge.
-
Using double sided tape tape the embroidered section to the bottom of the tray along the outer edge.
-
Have a piece of glass cut to the same size as the bottom of the tray and place on top of the embroidered section.


