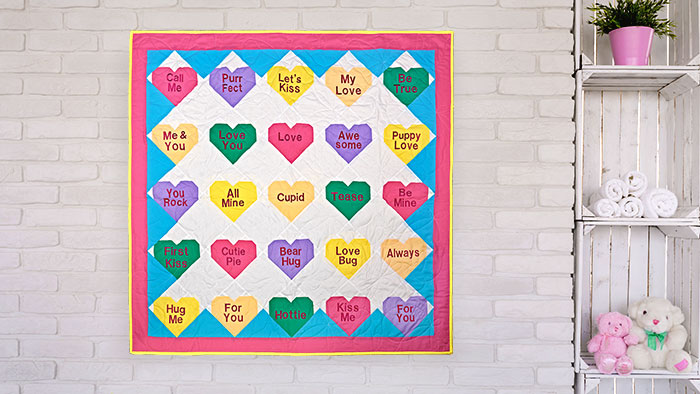
Create a fun candy dish quilt full of conversation hearts! These colorful heart-shaped pieced quilt blocks are reminiscent of the favorite Valentine's Day candy hearts and feature cute embroidered sayings. A perfect beginning quilting project to get your house cupid-ready this quilt is a fun way to bring a bright pop of color to your decor and a smile to your face! Click here to download instructions.
Materials:
- 3/4 yard of 45” wide white cotton fabric
- 5/8 yard of 45” wide blue cotton fabric
- 1/2 yard of 45” wide pink cotton fabric (hearts and border)
- 1/2 yard of 45” wide yellow cotton fabric (hearts and binding)
- 1/8 yard of 45” wide lavender cotton fabric (hearts)
- 1/8 yard of 45” wide apricot cotton fabric (hearts)
- 1/8 yard of 45” wide green cotton fabric (hearts)
- 1 3/8 yards of 45” cotton backing fabric
- Cut away Stabilizer
- Spray Adhesive
- Quilt batting
- Bright pink embroidery thread
- Madeira Cotona thread for piecing
- Madeira quilting thread
- Rotary cutting system
- Basic sewing supplies
Tools:
- Baby Lock Embroidery and Sewing Machine
- Baby Lock Quilting Machine
Steps:
-
Cut the following:
-
“A” blocks- cut two white fabric strips 5 ½” x width of fabric and then cut strips into sixteen blocks- 5 ½” x 5 ½”
-
“B” blocks- cut from white fabric four strips 1½” x width of fabric then cut 100 strips 1½” x 1½”. Cut two more strips 2½” x width of fabric then cut 25 strips 2½” x 2½”
-
From each of the pink yellow apricot lavender and green cotton fabric cut one strip 3½” x width of fabric and from each strip cut 5 3½” x 2½” and 5 3½” x 5½”
-
Row finishing triangles - cut two strips from blue fabric 5 7/8” x width of fabric then cut 8 strips 5 7/8” x 5 7/8” x 5 7/8”. Also cut one 6 1/4” x 6 ¼” square
-
From the pink cotton cut border 1 consisting of two strips 2½” x 35 3/4” and two strips 2½” x 40”
-
-
To make the “B” block stitch one 1½” square to two of the corners of each 2½” x 3½” and 3½” x 5½” colored pieces.
-
Clip away the (corner) outside of each seam press the seams toward the colored fabric.
-
-
Stitch a 2½” x 2½” white square to the right side of each colored 2½” x 3 ½” pieced section. Press the seam toward the colored piece.
-
Stitch the two units together. Press the seams toward the 3½” x 5½”units.
-
Prepare the machine for embroidery. Thread the machine with bright pink embroidery thread.
-
For the embroidery select a basic block font; select the necessary characters for the first conversation heart saying. Embroidery edit will be helpful for this process.
-
-
Hoop the heart block in the hoop the placement of the block will be on the diagonal. Use spray adhesive on the cut away stabilizer.
-
Repeat the embroidery process for each of the conversation heart blocks changing the saying with each heart. Trim away the excess stabilizer and press the blocks.
-
Prepare the blue blocks for the quilt by cutting the 5 7/8” squares into half along the diagonal and cut the one 6 ¼” square into fourths along the diagonals.
-
Lay the quilt out in rows. The rows will be on the diagonal with a blue half square triangle at each end. Press the seams toward the heart blocks.
-
The blue quarter square triangles will be added after the rows have all been assembled.
-
-
Stitch the rows together and press.
-
Stitch one blue quarter square triangle to each of the four corners of the quilt top.
-
Sew the final border to the quilt by first sewing the top and bottom strips on the quilt and then the side borders to the quilt.
-
Cut and piece backing fabric to measure at least 4” larger on all sides than the quilt top measures.
-
Layer the quilt top batting and backing. Baste the layers together.
-
Quilt as desired. In the sample it was quilted using the Pro Stitcher and the Regalia long arm quilting machine.
-
Bind the quilt.


