With Baby Lock Palette embroidery software and a ten-needle embroidery machine embroidering a baseball hat is easy! Palette creates the layout of the design while the multi-needle will be the workhorse to carry out the embroidery portion of the job. The two work together effortlessly until the final stitch is placed. Use the cap frame to embroider this hat in a snap! Download printable instructions.
Materials:
- Baby Lock Cut-Away Stabilizer (BLC201)
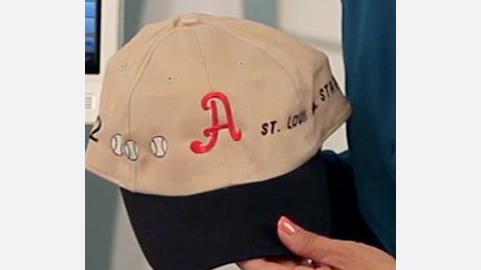
- 1 Cotton baseball cap
- Assortment of Madeira Polyester threads
- Chaco marking pen
Tools:
- Baby Lock® multi-needle embroidery machine
- Baby Lock Palette version 9 or newer
- Baby Lock (360mm x 60mm) Wide Cap Frame
Steps:
-
With the USB reader and writer cable box attached to the computer open the program by clicking on the Palette icon on the desktop.
-
Click on Cancel to close the dialog box.
-
To set up the workspace for the larger cap frame click on Design Settings on the top toolbar and follow the next set of steps:
-
Select the BNT machine symbol
-
Under the Hoop Size setting click on the down arrow and select the 360mm x 60mm Wide Cap Frame.
-
Click on OK to place the hoop on the workspace to show the sewing field.
-
-
The area that will be placed first will be the letter in the center. Follow the next set of steps:
-
Click on the Text icon
-
To size the letter highlight the size and type in 45mm.
-
Click on the down arrow next to the fonts to select font number 052.
-
Click on the color chip next to the stitch type and select the color red.
-
Left click on the workspace to open the Text Attributes.
-
Type in the letter “A” and Enter.
-
Click on the Arrange tab. Click on the Align down arrow and select Move to Center.
-
-
To place the baseballs on the left side of the letter click on the Home tab and follow the next set of steps:
-
Click on Import Patterns From Designs Library.
-
Click on the Sports category.
-
Select the Baseball design.
-
Click on Import.
-
Place the baseball to the bottom left of the letter “A”
-
Right click on the baseball and click on Copy right click and select Paste.
-
Move the duplicated baseball to the left of the first.
-
Click on Paste.
-
Move the third baseball to the left of the second baseball design.
-
-
To place the number 12 to the left side of the baseballs click on the text icon and follow the next set of steps:
-
Click on the workspace to open the Text Attributes field.
-
Change the font size to 20mm.
-
Click on the color chip and change the color to black.
-
Type in “12” in the text field and Enter.
-
Move the number “12” to the left of the baseballs
-
To select the baseballs and the number 12 left click and draw a box around them.
-
Click on the Arrange tab. Click on the down arrow in the Align field and select the Vertical bottom option.
-
-
To create the lettering for the team name follow the next set of steps:
-
Click on the Text icon.
-
Change the font size to 10mm.
-
Select font number 010.
-
Click on the color chip and select the color black.
-
Left click on the workspace.
-
Type in the words “St. LOUIS ALL STARS” and Enter.
-
Move the team name to the right of the letter “A”
-
Select the one of the baseballs while holding down the Ctrl key and select the team name.
-
Click on the Arrange tab. Click on the down arrow in the Align field and select the Vertical bottom option.
-
-
Following the Manufacturers’ directions attach the wide cap frame to the machine.
-
Refer to the manual for setting up the cap bracket and for hooping the cap.
-
With the machine on connect the USB end of the communication cable to the computer and the other end to the machine.
-
Going back to the Palette send the design to the Enterprise by clicking on the Send icon. Click on Send to Your Machine through to the USB drive.
-
Retrieve the design in the machine. The design will position itself upside down on the machine.
-
Once the cap frame has been placed on the machine move the design downward so that the design will embroider in the lowest position in the hoop (close to the cap bill).
-
Thread the machine with the appropriate thread colors and embroider the design.


