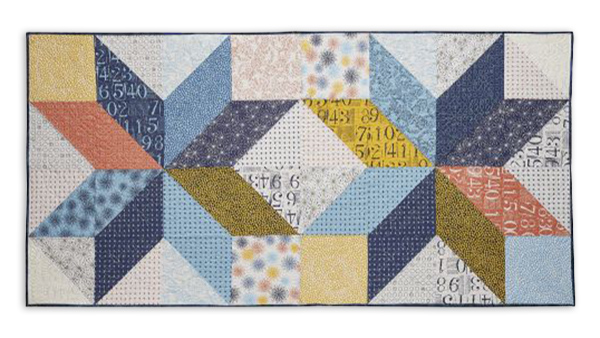
Dress up solid bedding with a colorful bed scarf that fits beautifully over the foot of your bed. This simple star pattern can be sewn over a weekend and makes a great gift or keepsake.The directions are designed to make one square. Make additional squares and sew the squares together to make the scarf wide enough for your bed. The size of the bed scarf is 74” x 36”. Click here to download instructions.
Materials:
- Layer Cake bundle (additional bundles may be needed to make an even wider scarf)
- Madeira® Cotona thread for piecing
- Madeira Quilting Thread
- Madeira Quilting Thread
- 3” x 18” Straight edge ruler
- Temporary spray adhesive
Tools:
- Baby Lock Lyric
- Baby Lock Coronet
Steps:
-
Sort the layer cake squares in three stacks of light med and dark prints. Set aside four squares of the light prints. These four squares will not be cut.
-
Cut 12 layer cake sections in half from corner to corner.
-
Following the diagram above place the sections together on a flat surface. 3.
-
Sew the pieces together in rows. Sew the rows together to make one square. Repeat for additional squares. In the sample two stars were used to create the finished scarf.
-
Square up each of the squares.
-
Sew each of the squares together along the side to make the scarf long enough to fit on your bed.
-
Cut the backing for the quilt 6” to 8” larger around than the quilt top.
-
Layer the backing batting and the quilt top on a flat surface. Use adhesive spray to hold the layers together during quilting or pin the layers together.
-
Clamp the quilt.
Clamp the quilt. (narrow end) to the top take-up roller on the Baby Lock Coronet quilting machine. Place the quilt sandwich on the frame with the left side of the quilt 6” to 8” from the edge and top edge of the quilt sandwich under then up and over the back of the roller. Clamp in place with the smaller clamps. Repeat for the remaining portion of the quilt top. Clamp the front of the quilt to the front roller using the larger clamps. Clamp the right edge of the quilt.
-
Thread the machine
-
Adjust the tension on the bobbin and place the bobbin in the machine.
-
Set the machine to regulated mode with the stitches set to 12 stitches per length.
-
Test for proper tension using a scrap of fabric attached to the side of the quilt.
-
Adjust the top tension as needed.
-
-
Baste 1/8” from the edge starting on the left side and across the top edge.
-
Quilt the layers together using your favorite stipple or quilt pattern. After your first pass has been completed remove the clamps from the back and front rollers.
-
Pull the quilt upward and reclamp the top roller with the clamps. Reclamp the side and the front edges. Use the C clamps to stop the top edge from flopping over onto the portion of the quilt
-
Enjoy!


