
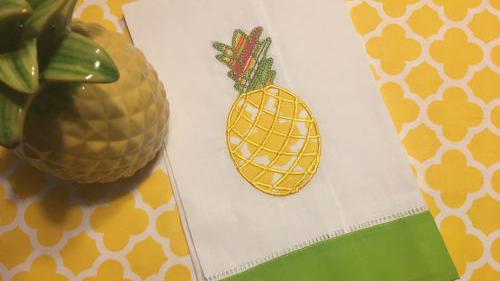
Add whimsy and fun to any home decor with this delightful pineapple tea towel! It is easy to turn artwork into a fun applique using the IQ Designer for the Baby Lock Destiny II or Solaris. Fabrics from Riley Blake make this a colorful project that would be a cute accessory to any home or a great gift for anyone! Download printable instructions and design.
Materials:
- 5” x 7” or larger hoop
- Baby Lock Tear-Away stabilizer
- Temporary spray adhesive
- 3-4 Spools decorative embroidery thread
- 1 purchased tea towel
- 2-5” square pieces of cotton fabric for the pineapple applique
- Ribbon or Trim optional to embellish the towel
- Pineapple Template
Tools:
- Baby Lock® Destiny II Sewing and Embroidery Machine OR
- Baby Lock Solaris Sewing and Embroidery Machine OR
- Baby Lock Valiant Embroidery Machine
Steps:
-
Locate the center bottom of your tea towel. Mark with a Frixion pen.
-
Hoop the towel with Baby Lock Tear-Away Firm stabilizer. Use a temporary adhesive spray if desired.
-
Hoop in the 9.5” X 9.5” or 5” x 7” hoop. Set aside.
-
Touch IQ Designer. You will be able to scan images right at the Destiny II and save the resulting image to memory. The Destiny II comes with the tools you need for scanning artwork.
-
Use the scanning frame and green magnets to hold the artwork to the frame.
-
-
Follow these tips for successful scanning:
-
Make sure the paper on the scan frame does not cover the white balance area (the black and white stripes on the frame).
-
Secure the artwork to the frame with the included magnets. Do not substitute other magnets.
-
-
To Scan the Pineapple artwork:
-
Place the scan frame with its artwork of choice onto the Destiny II.
-
Touch the Home key at the top of the LCD screen.
-
Touch IQ Designer on the Home page.
-
The IQ main page will open.
-
Touch Create Line Image at the top of the page.The scanning page of the IQ Designer opens.
-
Touch Scan. A box opens to say “The frame will move to be scanned with the built-in camera.”
-
Touch OK.
-
The image will be scanned. Note that the Stadium lighting is automatically dimmed for a better image.
-
When the scan is complete the Framing the Image page open
-
Touch and drag the double headed red arrows to crop the image.
-
Touch OK.
-
If needed adjust the gray-scale detection level to clean up the art work in the Result View.
-
Touch OK.
-
Touch Set. Your scanned image is placed on the create and edit page.
-
-
To Edit the Pineapple:
-
Each scan of a drawing can yield different results.
-
If your artwork is not to your liking you have the ability to edit the design before you stitch the design.
-
If you are going to re-use artwork again for a project you may want to save it after you have made any corrections.
-
Select the Eraser Tool.
-
For fine tuning adjustments select the smaller of the eraser options.
-
Using your stylus touch the areas where you want to remove additional lines or markings.
-
The Destiny II allows you to zoom up to 800%.
-
When you select to zoom you can then use the pan box in the preview window to move around the sections of your artwork. This allows for fine tune editing.
-
Make small taps to the screen with your stylus when in the zoom function.
-
The Undo button will allow you to go back if you have removed too much.
-
At this point SAVE your artwork.
-
-
Pineapple Applique--Layer 1:
-
For the Applique placement we want to create the outline stitches for each part of the pineapple so we know where to place the fabric for our pineapple and the top.
-
Select the Eraser and remove the inside lines of the pineapple and pineapple top. Leave the center line between the top and bottom of the pineapple.
-
Use the Zoom tools and the Preview Pane to pan around the design as need.
-
At this point SAVE your artwork again.
-
We will used this saved artwork several times to create the design.
-
Touch the Line Properties.
-
For the first placement stitch step of the applique the bean or run stitch will be a good selection. Select the Line Properties and select the bean stitch.
-
Touch the Fill Cup for the line properties and apply that line type to outline of the pineapple.
-
Touch Next
-
For a run or bean stitch select 2.5mm or .0.100”
-
Touch Preview
-
Touch OK.
-
Touch Set. A box opens to say “Converted to the embroidery pattern and IQ Designer will be exited. OK to continue to embroidery edit screen?”
-
Touch OK and your new design is placed on the Embroidery screen.
-
Touch Memory and save the design to your USB or Machine Memory.
-
Touch Add.
-
Go back to IQ Designer.
-
Retrieve the outline pineapple shape that was saved earlier.
-
-
Pineapple Applique--Layer 2:
-
For the Applique Material we will stitch down the fabric portion of the applique. We will create stitches designs for each part of the pineapple.
-
Select the Eraser and remove the bottom portion of the pineapple leaving the center line between the top and bottom of the pineapple. The fabric for the top will be stitched first.
-
Use the Zoom tools and the Preview Pane to pan around the design as needed.
-
At this point SAVE your artwork again
-
Touch the Line Properties
-
For the material stitch step of the applique the bean or run stitch will be a good selection. Select the Line Properties and select the bean stitch.
-
Touch the Fill Cup for the line properties and apply that line type to pineapple top.
-
Touch Next.
-
For a run or bean stitch select 2.0mm or .0.080”
-
Touch Preview.
-
Touch OK.
-
Touch Set. A box opens to say “Converted to the embroidery pattern and IQ Designer will be exited. OK to continue to embroidery edit screen?”
-
Touch OK and your new design is placed on the Embroidery screen
-
Use the Move keys or touch screen to position the line over the top portion pineapple-aligning it with the applique placement.
-
Touch Add.
-
Go back to IQ Designer.
-
Retrieve the outline pineapple shape that was saved earlier.
-
Repeat steps 1-15 but to create the applique material stitch for the bottom portion of the pineapple. Again making sure to leave the center line between the top and bottom.
-
For these first three parts of our applique we are going to touch Edit and touch Color Edit to change the color of the design to reflect the steps of our Applique.
-
Select the first outline section and select the Applique Position and then select the second and third color section and select Applique Material.
-
Touch Memory and save the design to your USB or Machine Memory.
-
-
Pineapple Applique--Layer 3:
-
The Applique Stitch will add a decorative stitch over the fabric portion of the applique. Create a stitch file for the pineapple top and bottom.
-
Touch Add.
-
Go back to IQ Designer.
-
Retrieve the original pineapple scan that was saved earlier.
-
Select the Eraser and remove the bottom portion of the pineapple INCLUDING the center line.
-
Use the Zoom tools and the Preview Pane to Pan around the design as need.
-
At this point SAVE your artwork again.
-
Touch the Line Properties.
-
For the top part of the pineapple applique a chain stitch was selected. Select the Line Properties and select the chain stitch and a green color chip. Touch OK.
-
Touch the Fill Cup for the line properties and apply that line type to pineapple top.
-
Touch Next.
-
For the chain stitch select 3.5mm or .0.140” and adjust the spacing(use the link key where applicable).
-
Touch Preview.
-
Touch OK.
-
Touch Set.
-
A box opens to say “Converted to the embroidery pattern and IQ Designer will be exited. OK to continue to embroidery edit screen?”
-
Touch OK and your new design is placed on the Embroidery screen.
-
Use the Move keys or touch screen to position the line over the top portion pineapple-aligning it with the applique placement.
-
Touch Add.
-
Go back to IQ Designer.
-
Retrieve the original pineapple scan that was saved earlier.
-
Repeat steps 1-7 but create the applique decorative stitch for the bottom of the pineapple. Include the center line for the decorative stitching part of the pineapple bottom.
-
For the bottom portion of the pineapple applique a satin stitch was selected. Select the Line Properties and select the satin stitch and a yellow color chip. Touch OK.
-
Touch the Fill Cup for the line properties and apply that line type to pineapple top.
-
Touch Next.
-
For the satin stitch select 3.0mm or .0.080” and adjust the spacing (use the link key where applicable).
-
Repeat steps 13-18 above for the pineapple bottom.
-
Just to be safe Touch Memory and save the design to your USB or Machine Memory.
-
Touch Embroidery.
-
Position the design as desired in the hoop.
-
-
Stitching out the Applique:
-
Place the hooped towel onto the machine.
-
Gather the embroidery thread and fabric for the applique.
-
Thread the machine.
-
Stitch out the applique steps.
-
Applique placement/position for entire pineapple outline
-
Applique material (run or bean stitch to tack fabric in place).
-
Place pineapple top fabric over placement stitch and tacked down with this stitch. Excess fabric is trimmed and removed.
-
Duplicate for the pineapple bottom fabric. Trim.
-
Applique (satin or decorative stitch).
-
Stitch out the pineapple top.
-
Stitch out the pineapple bottom.
-
Remove towel from the hoop.
-
Trim any excess threads remove tear-away stabilizer and press.
-
Add optional ribbon bow for decoration by stitching on with sewing machine.
-


